MCP 서버 구축하기
이 튜토리얼에서는 간단한 MCP 날씨 서버를 구축하고 호스트인 Claude Desktop에 연결합니다.
구축할 내용
두 가지 도구, 즉 get_alerts와 get_forecast를 제공하는 서버를 구축합니다. 그런 다음 이 서버를 MCP 호스트(이 예에서는 Claude Desktop)에 연결합니다.
MCP 핵심 개념
MCP 서버는 다음과 같은 세 가지 주요 기능을 제공할 수 있습니다.
- 리소스: 클라이언트가 읽을 수 있는 파일 형태의 데이터(API 응답이나 파일 내용 등)
- 도구: LLM이 호출할 수 있는 함수(사용자 승인 필요)
- 프롬프트: 사용자가 특정 작업을 수행하도록 돕는 미리 작성된 템플릿
이 튜토리얼에서는 주로 도구에 중점을 둡니다.
날씨 서버 구축을 시작해 보겠습니다! 여기에서 이번에 구축할 전체 코드를 확인할 수 있습니다.
사전 지식
이 빠른 시작 가이드는 다음 항목에 익숙하다고 가정합니다.
- Python
- Claude와 같은 LLM
MCP 서버 로깅
MCP 서버를 구현할 때는 로깅을 처리하는 방식에 주의해야 합니다.
STDIO 기반 서버: stdout에 절대 쓰지 마세요. stdout에 쓰면 JSON-RPC 메시지가 손상되어 서버가 작동하지 않습니다. print() 함수는 기본적으로 stdout에 쓰므로 STDIO 서버에서는 사용하지 마세요.
HTTP 기반 서버: 표준 출력 로깅은 HTTP 응답을 방해하지 않으므로 사용해도 됩니다.
모범 사례
- stderr에 기록하는 표준 라이브러리의
logging모듈을 사용합니다. logging.getLogger(__name__)을 사용해 모듈마다 로거를 하나씩 만들고 도구에서 호출합니다.
빠른 예제
import logging

logger = logging.getLogger(__name__)

# ❌ Bad (STDIO)
print("Processing request")

# ✅ Good (STDIO)
logger.info("Processing request")  # writes to stderr
시스템 요구 사항
- Python 3.10 이상이 설치되어 있어야 합니다.
- Python MCP SDK 2.0.0 이상을 사용해야 합니다.
환경 설정
먼저 uv를 설치하고 Python 프로젝트와 환경을 설정합니다.
curl -LsSf https://astral.sh/uv/install.sh | sh
powershell -ExecutionPolicy ByPass -c "irm https://astral.sh/uv/install.ps1 | iex"
그런 다음 터미널을 다시 시작하여 uv 명령을 인식하도록 합니다.
이제 프로젝트를 만들고 설정해 보겠습니다.
# Create a new directory for our project
uv init weather
cd weather

# Create virtual environment and activate it
uv venv
source .venv/bin/activate

# Install dependencies
uv add "mcp[cli]"

# Create our server file
touch weather.py
# Create a new directory for our project
uv init weather
cd weather

# Create virtual environment and activate it
uv venv
.venv\Scripts\activate

# Install dependencies
uv add mcp[cli]

# Create our server file
new-item weather.py
이제 서버 구축을 시작해 보겠습니다.
서버 구축하기
패키지 가져오기 및 인스턴스 설정
weather.py 파일 맨 위에 다음 내용을 추가합니다.
from typing import Any

import httpx2
from mcp.server import MCPServer

# Initialize MCPServer
mcp = MCPServer("weather")

# Constants
NWS_API_BASE = "https://api.weather.gov"
USER_AGENT = "weather-app/1.0"
httpx2는 SDK 자체에서 사용하는 HTTP 클라이언트이므로 mcp를 설치할 때 이미 함께 설치되었습니다.
MCPServer 클래스는 Python 타입 힌트와 독스트링을 사용해 도구 정의를 자동으로 생성하므로 MCP 도구를 쉽게 만들고 유지 관리할 수 있습니다.
헬퍼 함수
다음으로 National Weather Service API의 데이터를 조회하고 형식을 지정하는 헬퍼 함수를 추가합니다.
async def make_nws_request(url: str) -> dict[str, Any] | None:
    """Make a request to the NWS API with proper error handling."""
    headers = {"User-Agent": USER_AGENT, "Accept": "application/geo+json"}
    async with httpx2.AsyncClient() as client:
        try:
            response = await client.get(url, headers=headers, timeout=30.0)
            response.raise_for_status()
            return response.json()
        except Exception:
            return None


def format_alert(feature: dict) -> str:
    """Format an alert feature into a readable string."""
    props = feature["properties"]
    return f"""
Event: {props.get("event", "Unknown")}
Area: {props.get("areaDesc", "Unknown")}
Severity: {props.get("severity", "Unknown")}
Description: {props.get("description", "No description available")}
Instructions: {props.get("instruction", "No specific instructions provided")}
"""
도구 실행 구현하기
도구 실행 핸들러는 각 도구의 로직을 실제로 실행합니다. 이제 이를 추가해 보겠습니다.
@mcp.tool()
async def get_alerts(state: str) -> str:
    """Get weather alerts for a US state.

    Args:
        state: Two-letter US state code (e.g. CA, NY)
    """
    url = f"{NWS_API_BASE}/alerts/active/area/{state}"
    data = await make_nws_request(url)

    if not data or "features" not in data:
        return "Unable to fetch alerts or no alerts found."

    if not data["features"]:
        return "No active alerts for this state."

    alerts = [format_alert(feature) for feature in data["features"]]
    return "\n---\n".join(alerts)


@mcp.tool()
async def get_forecast(latitude: float, longitude: float) -> str:
    """Get weather forecast for a location.

    Args:
        latitude: Latitude of the location
        longitude: Longitude of the location
    """
    # First get the forecast grid endpoint
    points_url = f"{NWS_API_BASE}/points/{latitude},{longitude}"
    points_data = await make_nws_request(points_url)

    if not points_data:
        return "Unable to fetch forecast data for this location."

    # Get the forecast URL from the points response
    forecast_url = points_data["properties"]["forecast"]
    forecast_data = await make_nws_request(forecast_url)

    if not forecast_data:
        return "Unable to fetch detailed forecast."

    # Format the periods into a readable forecast
    periods = forecast_data["properties"]["periods"]
    forecasts = []
    for period in periods[:5]:  # Only show next 5 periods
        forecast = f"""
{period["name"]}:
Temperature: {period["temperature"]}°{period["temperatureUnit"]}
Wind: {period["windSpeed"]} {period["windDirection"]}
Forecast: {period["detailedForecast"]}
"""
        forecasts.append(forecast)

    return "\n---\n".join(forecasts)
서버 실행하기
마지막으로 서버를 초기화하고 실행합니다.
if __name__ == "__main__":
    mcp.run(transport="stdio")
서버가 완성되었습니다! uv run weather.py을 실행하여 MCP 서버를 시작하면 MCP 호스트에서 오는 메시지를 수신합니다.
이제 기존 MCP 호스트인 Claude Desktop에서 서버를 테스트해 보겠습니다.
Claude Desktop으로 서버 테스트하기
먼저 Claude Desktop이 설치되어 있는지 확인하세요. 여기에서 최신 버전을 설치할 수 있습니다. Claude Desktop이 이미 설치되어 있다면 최신 버전으로 업데이트되어 있는지 확인하세요.
사용하려는 MCP 서버를 Claude Desktop에 설정해야 합니다. 텍스트 편집기에서 ~/Library/Application Support/Claude/claude_desktop_config.json에 있는 Claude Desktop 앱 구성 파일을 여세요. 파일이 없다면 새로 만드세요.
예를 들어 VS Code가 설치되어 있다면 다음과 같이 엽니다.
code ~/.config/Claude/claude_desktop_config.json
code ~/Library/Application\ Support/Claude/claude_desktop_config.json
code $env:AppData\Claude\claude_desktop_config.json
그런 다음 mcpServers 키에 서버를 추가합니다. 서버가 하나 이상 올바르게 구성되어 있어야 Claude Desktop에 MCP UI 요소가 표시됩니다.
여기서는 다음과 같이 날씨 서버 하나를 추가합니다.
{
  "mcpServers": {
    "weather": {
      "command": "uv",
      "args": [
        "--directory",
        "/ABSOLUTE/PATH/TO/PARENT/FOLDER/weather",
        "run",
        "weather.py"
      ]
    }
  }
}
{
  "mcpServers": {
    "weather": {
      "command": "uv",
      "args": [
        "--directory",
        "C:\\ABSOLUTE\\PATH\\TO\\PARENT\\FOLDER\\weather",
        "run",
        "weather.py"
      ]
    }
  }
}
이 구성은 Claude Desktop에 다음 내용을 알려 줍니다.
- 이름이 "weather"인 MCP 서버가 있습니다.
uv --directory /ABSOLUTE/PATH/TO/PARENT/FOLDER/weather run weather.py을 실행해 서버를 시작합니다.
파일을 저장하고 Claude Desktop을 다시 시작하세요.
날씨 서버 구축을 시작해 보겠습니다! 여기에서 이번에 구축할 전체 코드를 확인할 수 있습니다.
사전 지식
이 빠른 시작 가이드는 다음 항목에 익숙하다고 가정합니다.
- TypeScript
- Claude와 같은 LLM
MCP 서버 로깅
MCP 서버를 구현할 때는 로깅을 처리하는 방식에 주의해야 합니다.
STDIO 기반 서버: 기본적으로 표준 출력(stdout)에 쓰는 console.log()을 절대 사용하지 마세요. stdout에 쓰면 JSON-RPC 메시지가 손상되어 서버가 작동하지 않습니다.
HTTP 기반 서버: 표준 출력 로깅은 HTTP 응답을 방해하지 않으므로 사용해도 됩니다.
모범 사례
- stderr에 쓰는
console.error()을 사용하거나, stderr 또는 파일에 기록하는 로깅 라이브러리를 사용합니다.
빠른 예제
// ❌ Bad (STDIO)
console.log("Server started");

// ✅ Good (STDIO)
console.error("Server started"); // stderr is safe
시스템 요구 사항
TypeScript를 사용하려면 최신 버전의 Node가 설치되어 있어야 합니다.
환경 설정
먼저 Node.js와 npm이 설치되어 있지 않다면 설치하세요. nodejs.org에서 다운로드할 수 있습니다. Node.js 설치를 확인합니다.
node --version
npm --version
이 튜토리얼에는 Node.js 20 이상이 필요합니다.
이제 프로젝트를 만들고 설정해 보겠습니다.
# Create a new directory for our project
mkdir weather
cd weather

# Initialize a new npm project
npm init -y

# Install dependencies
npm install @modelcontextprotocol/server zod
npm install -D @types/node typescript

# Create our files
mkdir src
touch src/index.ts
# Create a new directory for our project
md weather
cd weather

# Initialize a new npm project
npm init -y

# Install dependencies
npm install @modelcontextprotocol/server zod
npm install -D @types/node typescript

# Create our files
md src
new-item src\index.ts
package.json에 type: "module"과 빌드 스크립트를 추가합니다.
{
  "type": "module",
  "bin": {
    "weather": "./build/index.js"
  },
  "scripts": {
    "build": "tsc && chmod 755 build/index.js"
  },
  "files": ["build"]
}
프로젝트 루트에 tsconfig.json를 만듭니다.
{
  "compilerOptions": {
    "target": "ES2022",
    "module": "Node16",
    "moduleResolution": "Node16",
    "types": ["node"],
    "outDir": "./build",
    "rootDir": "./src",
    "strict": true,
    "esModuleInterop": true,
    "skipLibCheck": true,
    "forceConsistentCasingInFileNames": true
  },
  "include": ["src/**/*"],
  "exclude": ["node_modules"]
}
이제 서버 구축을 시작해 보겠습니다.
서버 구축하기
패키지 가져오기 및 인스턴스 설정
src/index.ts 파일 맨 위에 다음 내용을 추가합니다.
import { McpServer } from "@modelcontextprotocol/server";
import { StdioServerTransport } from "@modelcontextprotocol/server/stdio";
import { z } from "zod";

const NWS_API_BASE = "https://api.weather.gov";
const USER_AGENT = "weather-app/1.0";

// Create server instance
const server = new McpServer({
  name: "weather",
  version: "1.0.0",
});
헬퍼 함수
다음으로 National Weather Service API의 데이터를 조회하고 형식을 지정하는 헬퍼 함수를 추가합니다.
// Helper function for making NWS API requests
async function makeNWSRequest<T>(url: string): Promise<T | null> {
  const headers = {
    "User-Agent": USER_AGENT,
    Accept: "application/geo+json",
  };

  try {
    const response = await fetch(url, { headers });
    if (!response.ok) {
      throw new Error(`HTTP error! status: ${response.status}`);
    }
    return (await response.json()) as T;
  } catch (error) {
    console.error("Error making NWS request:", error);
    return null;
  }
}

interface AlertFeature {
  properties: {
    event?: string;
    areaDesc?: string;
    severity?: string;
    status?: string;
    headline?: string;
  };
}

// Format alert data
function formatAlert(feature: AlertFeature): string {
  const props = feature.properties;
  return [
    `Event: ${props.event || "Unknown"}`,
    `Area: ${props.areaDesc || "Unknown"}`,
    `Severity: ${props.severity || "Unknown"}`,
    `Status: ${props.status || "Unknown"}`,
    `Headline: ${props.headline || "No headline"}`,
    "---",
  ].join("\n");
}

interface ForecastPeriod {
  name?: string;
  temperature?: number;
  temperatureUnit?: string;
  windSpeed?: string;
  windDirection?: string;
  shortForecast?: string;
}

interface AlertsResponse {
  features: AlertFeature[];
}

interface PointsResponse {
  properties: {
    forecast?: string;
  };
}

interface ForecastResponse {
  properties: {
    periods: ForecastPeriod[];
  };
}
도구 실행 구현하기
도구 실행 핸들러는 각 도구의 로직을 실제로 실행합니다. 이제 이를 추가해 보겠습니다.
// Register weather tools

server.registerTool(
  "get_alerts",
  {
    description: "Get weather alerts for a state",
    inputSchema: z.object({
      state: z
        .string()
        .length(2)
        .describe("Two-letter state code (e.g. CA, NY)"),
    }),
  },
  async ({ state }) => {
    const stateCode = state.toUpperCase();
    const alertsUrl = `${NWS_API_BASE}/alerts?area=${stateCode}`;
    const alertsData = await makeNWSRequest<AlertsResponse>(alertsUrl);

    if (!alertsData) {
      return {
        content: [
          {
            type: "text",
            text: "Failed to retrieve alerts data",
          },
        ],
      };
    }

    const features = alertsData.features || [];
    if (!features.length) {
      return {
        content: [
          {
            type: "text",
            text: `No active alerts for ${stateCode}`,
          },
        ],
      };
    }

    const formattedAlerts = features.map(formatAlert);
    const alertsText = `Active alerts for ${stateCode}:\n\n${formattedAlerts.join("\n")}`;

    return {
      content: [
        {
          type: "text",
          text: alertsText,
        },
      ],
    };
  },
);

server.registerTool(
  "get_forecast",
  {
    description: "Get weather forecast for a location",
    inputSchema: z.object({
      latitude: z
        .number()
        .min(-90)
        .max(90)
        .describe("Latitude of the location"),
      longitude: z
        .number()
        .min(-180)
        .max(180)
        .describe("Longitude of the location"),
    }),
  },
  async ({ latitude, longitude }) => {
    // Get grid point data
    const pointsUrl = `${NWS_API_BASE}/points/${latitude.toFixed(4)},${longitude.toFixed(4)}`;
    const pointsData = await makeNWSRequest<PointsResponse>(pointsUrl);

    if (!pointsData) {
      return {
        content: [
          {
            type: "text",
            text: `Failed to retrieve grid point data for coordinates: ${latitude}, ${longitude}. This location may not be supported by the NWS API (only US locations are supported).`,
          },
        ],
      };
    }

    const forecastUrl = pointsData.properties?.forecast;
    if (!forecastUrl) {
      return {
        content: [
          {
            type: "text",
            text: "Failed to get forecast URL from grid point data",
          },
        ],
      };
    }

    // Get forecast data
    const forecastData = await makeNWSRequest<ForecastResponse>(forecastUrl);
    if (!forecastData) {
      return {
        content: [
          {
            type: "text",
            text: "Failed to retrieve forecast data",
          },
        ],
      };
    }

    const periods = forecastData.properties?.periods || [];
    if (periods.length === 0) {
      return {
        content: [
          {
            type: "text",
            text: "No forecast periods available",
          },
        ],
      };
    }

    // Format forecast periods
    const formattedForecast = periods.map((period: ForecastPeriod) =>
      [
        `${period.name || "Unknown"}:`,
        `Temperature: ${period.temperature || "Unknown"}°${period.temperatureUnit || "F"}`,
        `Wind: ${period.windSpeed || "Unknown"} ${period.windDirection || ""}`,
        `${period.shortForecast || "No forecast available"}`,
        "---",
      ].join("\n"),
    );

    const forecastText = `Forecast for ${latitude}, ${longitude}:\n\n${formattedForecast.join("\n")}`;

    return {
      content: [
        {
          type: "text",
          text: forecastText,
        },
      ],
    };
  },
);
서버 실행하기
마지막으로 서버를 실행할 main 함수를 구현합니다.
async function main() {
  const transport = new StdioServerTransport();
  await server.connect(transport);
  console.error("Weather MCP Server running on stdio");
}

main().catch((error) => {
  console.error("Fatal error in main():", error);
  process.exit(1);
});
서버를 빌드하려면 반드시 npm run build을 실행하세요! 서버 연결에 꼭 필요한 중요한 단계입니다.
이제 기존 MCP 호스트인 Claude Desktop에서 서버를 테스트해 보겠습니다.
Claude Desktop으로 서버 테스트하기
먼저 Claude Desktop이 설치되어 있는지 확인하세요. 여기에서 최신 버전을 설치할 수 있습니다. Claude Desktop이 이미 설치되어 있다면 최신 버전으로 업데이트되어 있는지 확인하세요.
사용하려는 MCP 서버를 Claude Desktop에 설정해야 합니다. 텍스트 편집기에서 ~/Library/Application Support/Claude/claude_desktop_config.json에 있는 Claude Desktop 앱 구성 파일을 여세요. 파일이 없다면 새로 만드세요.
예를 들어 VS Code가 설치되어 있다면 다음과 같이 엽니다.
code ~/.config/Claude/claude_desktop_config.json
code ~/Library/Application\ Support/Claude/claude_desktop_config.json
code $env:AppData\Claude\claude_desktop_config.json
그런 다음 mcpServers 키에 서버를 추가합니다. 서버가 하나 이상 올바르게 구성되어 있어야 Claude Desktop에 MCP UI 요소가 표시됩니다.
여기서는 다음과 같이 날씨 서버 하나를 추가합니다.
{
  "mcpServers": {
    "weather": {
      "command": "node",
      "args": ["/ABSOLUTE/PATH/TO/PARENT/FOLDER/weather/build/index.js"]
    }
  }
}
{
  "mcpServers": {
    "weather": {
      "command": "node",
      "args": ["C:\\PATH\\TO\\PARENT\\FOLDER\\weather\\build\\index.js"]
    }
  }
}
이 구성은 Claude Desktop에 다음 내용을 알려 줍니다.
- 이름이 "weather"인 MCP 서버가 있습니다.
node /ABSOLUTE/PATH/TO/PARENT/FOLDER/weather/build/index.js을 실행해 서버를 시작합니다.
파일을 저장하고 Claude Desktop을 다시 시작하세요.
날씨 서버 구축을 시작해 보겠습니다! 여기에서 이번에 구축할 전체 코드를 확인할 수 있습니다.
자세한 내용은 MCP Server Boot Starter 참조 문서를 확인하세요. MCP 서버를 직접 구현하려면 MCP Server Java SDK 문서를 참조하세요.
MCP 서버 로깅
MCP 서버를 구현할 때는 로깅을 처리하는 방식에 주의해야 합니다.
STDIO 기반 서버: 표준 출력(stdout)에 쓰는 System.out.println() 또는 System.out.print()을 절대 사용하지 마세요. stdout에 쓰면 JSON-RPC 메시지가 손상되어 서버가 작동하지 않습니다.
HTTP 기반 서버: 표준 출력 로깅은 HTTP 응답을 방해하지 않으므로 사용해도 됩니다.
모범 사례
- stderr 또는 파일에 기록하는 로깅 라이브러리를 사용합니다.
- 구성한 로깅 라이브러리가 stdout에 쓰지 않도록 확인합니다.
시스템 요구 사항
- Java 17 이상이 설치되어 있어야 합니다.
- Spring Boot 3.3.x 이상
환경 설정
Spring Initializer를 사용하여 프로젝트를 시작합니다.
다음 의존성을 추가해야 합니다.
<dependencies>
      <dependency>
          <groupId>org.springframework.ai</groupId>
          <artifactId>spring-ai-starter-mcp-server</artifactId>
      </dependency>

      <dependency>
          <groupId>org.springframework</groupId>
          <artifactId>spring-web</artifactId>
      </dependency>
</dependencies>
dependencies {
  implementation platform("org.springframework.ai:spring-ai-starter-mcp-server")
  implementation platform("org.springframework:spring-web")
}
그런 다음 애플리케이션 속성을 설정해 애플리케이션을 구성합니다.
spring.main.bannerMode=off
logging.pattern.console=
logging:
  pattern:
    console:
spring:
  main:
    banner-mode: off
사용 가능한 모든 속성은 서버 구성 속성 문서에서 확인할 수 있습니다.
이제 서버 구축을 시작해 보겠습니다.
서버 구축하기
날씨 서비스
REST 클라이언트를 사용하여 National Weather Service API의 데이터를 조회하는 WeatherService.java를 구현해 보겠습니다.
@Service
public class WeatherService {

	private final RestClient restClient;

	public WeatherService() {
		this.restClient = RestClient.builder()
			.baseUrl("https://api.weather.gov")
			.defaultHeader("Accept", "application/geo+json")
			.defaultHeader("User-Agent", "WeatherApiClient/1.0 (your@email.com)")
			.build();
	}

  @Tool(description = "Get weather forecast for a specific latitude/longitude")
  public String getWeatherForecastByLocation(
      double latitude,   // Latitude coordinate
      double longitude   // Longitude coordinate
  ) {
      // Returns detailed forecast including:
      // - Temperature and unit
      // - Wind speed and direction
      // - Detailed forecast description
  }

  @Tool(description = "Get weather alerts for a US state")
  public String getAlerts(
      @ToolParam(description = "Two-letter US state code (e.g. CA, NY)") String state
  ) {
      // Returns active alerts including:
      // - Event type
      // - Affected area
      // - Severity
      // - Description
      // - Safety instructions
  }

  // ......
}
@Service 애너테이션은 서비스를 애플리케이션 컨텍스트에 자동으로 등록합니다.
Spring AI의 @Tool 애너테이션을 사용하면 MCP 도구를 쉽게 만들고 유지 관리할 수 있습니다.
자동 구성이 이러한 도구를 MCP 서버에 자동으로 등록합니다.
Boot 애플리케이션 만들기
@SpringBootApplication
public class McpServerApplication {

	public static void main(String[] args) {
		SpringApplication.run(McpServerApplication.class, args);
	}

	@Bean
	public ToolCallbackProvider weatherTools(WeatherService weatherService) {
		return  MethodToolCallbackProvider.builder().toolObjects(weatherService).build();
	}
}
MethodToolCallbackProvider 유틸리티를 사용해 @Tools를 MCP 서버에서 사용할 수 있는 실행 가능한 콜백으로 변환합니다.
서버 실행하기
마지막으로 서버를 빌드합니다.
./mvnw clean install
그러면 mcp-weather-stdio-server-0.0.1-SNAPSHOT.jar 파일이 target 폴더에 생성됩니다.
이제 기존 MCP 호스트인 Claude Desktop에서 서버를 테스트해 보겠습니다.
Claude Desktop으로 서버 테스트하기
먼저 Claude Desktop이 설치되어 있는지 확인하세요. 여기에서 최신 버전을 설치할 수 있습니다. Claude Desktop이 이미 설치되어 있다면 최신 버전으로 업데이트되어 있는지 확인하세요.
사용하려는 MCP 서버를 Claude Desktop에 설정해야 합니다.
텍스트 편집기에서 ~/Library/Application Support/Claude/claude_desktop_config.json에 있는 Claude Desktop 앱 구성 파일을 여세요.
파일이 없다면 새로 만드세요.
예를 들어 VS Code가 설치되어 있다면 다음과 같이 엽니다.
code ~/.config/Claude/claude_desktop_config.json
code ~/Library/Application\ Support/Claude/claude_desktop_config.json
code $env:AppData\Claude\claude_desktop_config.json
그런 다음 mcpServers 키에 서버를 추가합니다.
서버가 하나 이상 올바르게 구성되어 있어야 Claude Desktop에 MCP UI 요소가 표시됩니다.
여기서는 다음과 같이 날씨 서버 하나를 추가합니다.
{
  "mcpServers": {
    "spring-ai-mcp-weather": {
      "command": "java",
      "args": [
        "-Dspring.ai.mcp.server.stdio=true",
        "-jar",
        "/ABSOLUTE/PATH/TO/PARENT/FOLDER/mcp-weather-stdio-server-0.0.1-SNAPSHOT.jar"
      ]
    }
  }
}
{
  "mcpServers": {
    "spring-ai-mcp-weather": {
      "command": "java",
      "args": [
        "-Dspring.ai.mcp.server.transport=STDIO",
        "-jar",
        "C:\\ABSOLUTE\\PATH\\TO\\PARENT\\FOLDER\\weather\\mcp-weather-stdio-server-0.0.1-SNAPSHOT.jar"
      ]
    }
  }
}
이 구성은 Claude Desktop에 다음 내용을 알려 줍니다.
- 이름이 "my-weather-server"인 MCP 서버가 있습니다.
java -jar /ABSOLUTE/PATH/TO/PARENT/FOLDER/mcp-weather-stdio-server-0.0.1-SNAPSHOT.jar을 실행해 서버를 시작합니다.
파일을 저장하고 Claude Desktop을 다시 시작하세요.
Java 클라이언트로 서버 테스트하기
MCP 클라이언트 직접 만들기
McpClient을 사용해 서버에 연결합니다.
var stdioParams = ServerParameters.builder("java")
  .args("-jar", "/ABSOLUTE/PATH/TO/PARENT/FOLDER/mcp-weather-stdio-server-0.0.1-SNAPSHOT.jar")
  .build();

var stdioTransport = new StdioClientTransport(stdioParams);

var mcpClient = McpClient.sync(stdioTransport).build();

mcpClient.initialize();

ListToolsResult toolsList = mcpClient.listTools();

CallToolResult weather = mcpClient.callTool(
  new CallToolRequest("getWeatherForecastByLocation",
      Map.of("latitude", "47.6062", "longitude", "-122.3321")));

CallToolResult alert = mcpClient.callTool(
  new CallToolRequest("getAlerts", Map.of("state", "NY")));

mcpClient.closeGracefully();
MCP Client Boot Starter 사용하기
spring-ai-starter-mcp-client 의존성을 사용해 새로운 Boot Starter 애플리케이션을 만듭니다.
<dependency>
    <groupId>org.springframework.ai</groupId>
    <artifactId>spring-ai-starter-mcp-client</artifactId>
</dependency>
spring.ai.mcp.client.stdio.servers-configuration 속성이 claude_desktop_config.json을 가리키도록 설정합니다.
기존 Anthropic Desktop 구성을 재사용할 수 있습니다.
spring.ai.mcp.client.stdio.servers-configuration=file:PATH/TO/claude_desktop_config.json
클라이언트 애플리케이션을 시작하면 자동 구성이 claude_desktop_config.json에서 MCP 클라이언트를 자동으로 생성합니다.
자세한 내용은 MCP Client Boot Starter 참조 문서를 확인하세요.
Java MCP 서버 예제 더 보기
starter-webflux-server는 WebFlux Starter로 HTTP 기반 MCP 서버를 만드는 방법을 보여 줍니다.
Streamable HTTP로 제공하려면 spring.ai.mcp.server.protocol=STREAMABLE 속성을 설정하세요.
또한 Spring Boot의 자동 구성 기능을 사용해 MCP 도구, 리소스, 프롬프트를 정의하고 등록하는 방법을 보여 줍니다.
날씨 서버 구축을 시작해 보겠습니다! 여기에서 이번에 구축할 전체 코드를 확인할 수 있습니다.
사전 지식
이 빠른 시작 가이드는 다음 항목에 익숙하다고 가정합니다.
- Kotlin
- Claude와 같은 LLM
MCP 서버 로깅
MCP 서버를 구현할 때는 로깅을 처리하는 방식에 주의해야 합니다.
STDIO 기반 서버: 기본적으로 표준 출력(stdout)에 쓰는 println()을 절대 사용하지 마세요. stdout에 쓰면 JSON-RPC 메시지가 손상되어 서버가 작동하지 않습니다.
HTTP 기반 서버: 표준 출력 로깅은 HTTP 응답을 방해하지 않으므로 사용해도 됩니다.
모범 사례
- stderr 또는 파일에 기록하는 로깅 라이브러리를 사용합니다.
시스템 요구 사항
- JDK 11 이상이 설치되어 있어야 합니다.
환경 설정
먼저 java와 gradle이 설치되어 있지 않다면 설치하세요.
java는 Oracle JDK 공식 웹사이트에서 다운로드할 수 있습니다.
java 설치를 확인합니다.
java --version
이제 프로젝트를 만들고 설정합니다.
# Create a new directory for our project
mkdir weather
cd weather

# Initialize a new kotlin project
gradle init
# Create a new directory for our project
md weather
cd weather

# Initialize a new kotlin project
gradle init
gradle init을 실행한 후 프로젝트 유형으로 Application, 프로그래밍 언어로 Kotlin을 선택합니다.
또는 IntelliJ IDEA 프로젝트 마법사를 사용해 Kotlin 애플리케이션을 만들 수 있습니다.
프로젝트를 만든 후 build.gradle.kts의 내용을 다음과 같이 바꿉니다.
// Check latest versions at https://github.com/modelcontextprotocol/kotlin-sdk/releases
val mcpVersion = "0.9.0"
val ktorVersion = "3.2.3"
val slf4jVersion = "2.0.17"

plugins {
    kotlin("jvm") version "2.3.20"
    kotlin("plugin.serialization") version "2.3.20"
    id("com.gradleup.shadow") version "8.3.9"
    application
}

application {
    mainClass.set("MainKt")
}

dependencies {
    implementation("io.modelcontextprotocol:kotlin-sdk:$mcpVersion")
    implementation("io.ktor:ktor-client-content-negotiation:$ktorVersion")
    implementation("io.ktor:ktor-serialization-kotlinx-json:$ktorVersion")
    implementation("io.ktor:ktor-client-cio:$ktorVersion")
    implementation("org.slf4j:slf4j-simple:$slf4jVersion")
}
모든 설정이 올바른지 확인합니다.
./gradlew build
이제 서버 구축을 시작해 보겠습니다.
서버 구축하기
인스턴스 설정
서버 초기화 함수를 추가합니다.
fun runMcpServer() {
    val server = Server(
        Implementation(
            name = "weather",
            version = "1.0.0",
        ),
        ServerOptions(
            capabilities = ServerCapabilities(tools = ServerCapabilities.Tools(listChanged = true)),
        ),
    )

    // register tools on server here

    val transport = StdioServerTransport(
        System.`in`.asInput(),
        System.out.asSink().buffered(),
    )

    runBlocking {
        val session = server.createSession(transport)
        val done = Job()
        session.onClose {
            done.complete()
        }
        done.join()
    }
}
Weather API 헬퍼 함수
다음으로 National Weather Service API의 응답을 조회하고 변환하는 함수와 데이터 클래스를 추가합니다.
val httpClient = HttpClient(CIO) {
    defaultRequest {
        url("https://api.weather.gov")
        headers {
            append("Accept", "application/geo+json")
            append("User-Agent", "WeatherApiClient/1.0")
        }
        contentType(ContentType.Application.Json)
    }
    install(ContentNegotiation) {
        json(Json { ignoreUnknownKeys = true })
    }
}

// Extension function to fetch weather alerts for a given state
suspend fun HttpClient.getAlerts(state: String): List<String> {
    val alerts = this.get("/alerts/active/area/$state").body<AlertsResponse>()
    return alerts.features.map { feature ->
        """
            Event: ${feature.properties.event}
            Area: ${feature.properties.areaDesc}
            Severity: ${feature.properties.severity}
            Status: ${feature.properties.status}
            Headline: ${feature.properties.headline}
        """.trimIndent()
    }
}

// Extension function to fetch forecast information for given latitude and longitude
suspend fun HttpClient.getForecast(latitude: Double, longitude: Double): List<String> {
    val points = this.get("/points/$latitude,$longitude").body<PointsResponse>()
    val forecastUrl = points.properties.forecast ?: error("No forecast URL available")
    val forecast = this.get(forecastUrl).body<ForecastResponse>()
    return forecast.properties.periods.map { period ->
        """
            ${period.name}:
            Temperature: ${period.temperature}°${period.temperatureUnit}
            Wind: ${period.windSpeed} ${period.windDirection}
            ${period.shortForecast}
        """.trimIndent()
    }
}

@Serializable
data class PointsResponse(val properties: PointsProperties)

@Serializable
data class PointsProperties(val forecast: String? = null)

@Serializable
data class ForecastResponse(val properties: ForecastProperties)

@Serializable
data class ForecastProperties(val periods: List<ForecastPeriod> = emptyList())

@Serializable
data class ForecastPeriod(
    val name: String? = null,
    val temperature: Int? = null,
    val temperatureUnit: String? = null,
    val windSpeed: String? = null,
    val windDirection: String? = null,
    val shortForecast: String? = null,
)

@Serializable
data class AlertsResponse(val features: List<AlertFeature> = emptyList())

@Serializable
data class AlertFeature(val properties: AlertProperties)

@Serializable
data class AlertProperties(
    val event: String? = null,
    val areaDesc: String? = null,
    val severity: String? = null,
    val status: String? = null,
    val headline: String? = null,
)
도구 실행 구현하기
도구 실행 핸들러는 각 도구의 로직을 실제로 실행합니다. 이제 이를 추가해 보겠습니다.
// Register weather tools

server.addTool(
    name = "get_alerts",
    description = "Get weather alerts for a US state. Input is a two-letter US state code (e.g. CA, NY)",
    inputSchema = ToolSchema(
        properties = buildJsonObject {
            putJsonObject("state") {
                put("type", "string")
                put("description", "Two-letter US state code (e.g. CA, NY)")
            }
        },
        required = listOf("state"),
    ),
) { request ->
    val state = request.arguments?.get("state")?.jsonPrimitive?.content
        ?: return@addTool CallToolResult(
            content = listOf(TextContent("The 'state' parameter is required.")),
        )

    val alerts = httpClient.getAlerts(state)
    CallToolResult(content = alerts.map { TextContent(it) })
}

server.addTool(
    name = "get_forecast",
    description = "Get weather forecast for a location. Note: only US locations are supported by the NWS API.",
    inputSchema = ToolSchema(
        properties = buildJsonObject {
            putJsonObject("latitude") {
                put("type", "number")
                put("description", "Latitude of the location")
            }
            putJsonObject("longitude") {
                put("type", "number")
                put("description", "Longitude of the location")
            }
        },
        required = listOf("latitude", "longitude"),
    ),
) { request ->
    val latitude = request.arguments?.get("latitude")?.jsonPrimitive?.doubleOrNull
    val longitude = request.arguments?.get("longitude")?.jsonPrimitive?.doubleOrNull
    if (latitude == null || longitude == null) {
        return@addTool CallToolResult(
            content = listOf(TextContent("The 'latitude' and 'longitude' parameters are required.")),
        )
    }

    val forecast = httpClient.getForecast(latitude, longitude)
    CallToolResult(content = forecast.map { TextContent(it) })
}
서버 실행하기
마지막으로 서버를 실행할 main 함수를 구현합니다.
fun main() = runMcpServer()
개발 중에는 서버를 직접 실행할 수 있습니다.
./gradlew run
프로덕션 환경에서는 shadow JAR를 빌드합니다.
./gradlew build
java -jar build/libs/weather-0.1.0-all.jar
이제 기존 MCP 호스트인 Claude Desktop에서 서버를 테스트해 보겠습니다.
Claude Desktop으로 서버 테스트하기
먼저 Claude Desktop이 설치되어 있는지 확인하세요. 여기에서 최신 버전을 설치할 수 있습니다. Claude Desktop이 이미 설치되어 있다면 최신 버전으로 업데이트되어 있는지 확인하세요.
사용하려는 MCP 서버를 Claude Desktop에 설정해야 합니다.
텍스트 편집기에서 ~/Library/Application Support/Claude/claude_desktop_config.json에 있는 Claude Desktop 앱 구성 파일을 여세요.
파일이 없다면 새로 만드세요.
예를 들어 VS Code가 설치되어 있다면 다음과 같이 엽니다.
code ~/.config/Claude/claude_desktop_config.json
code ~/Library/Application\ Support/Claude/claude_desktop_config.json
code $env:AppData\Claude\claude_desktop_config.json
그런 다음 mcpServers 키에 서버를 추가합니다.
서버가 하나 이상 올바르게 구성되어 있어야 Claude Desktop에 MCP UI 요소가 표시됩니다.
여기서는 다음과 같이 날씨 서버 하나를 추가합니다.
{
  "mcpServers": {
    "weather": {
      "command": "java",
      "args": [
        "-jar",
        "/ABSOLUTE/PATH/TO/PARENT/FOLDER/weather/build/libs/weather-0.1.0-all.jar"
      ]
    }
  }
}
{
  "mcpServers": {
    "weather": {
      "command": "java",
      "args": [
        "-jar",
        "C:\\PATH\\TO\\PARENT\\FOLDER\\weather\\build\\libs\\weather-0.1.0-all.jar"
      ]
    }
  }
}
이 구성은 Claude Desktop에 다음 내용을 알려 줍니다.
- 이름이 "weather"인 MCP 서버가 있습니다.
java -jar /ABSOLUTE/PATH/TO/PARENT/FOLDER/weather/build/libs/weather-0.1.0-all.jar을 실행해 서버를 시작합니다.
파일을 저장하고 Claude Desktop을 다시 시작하세요.
날씨 서버 구축을 시작해 보겠습니다! 여기에서 이번에 구축할 전체 코드를 확인할 수 있습니다.
사전 지식
이 빠른 시작 가이드는 다음 항목에 익숙하다고 가정합니다.
- C#
- Claude와 같은 LLM
- .NET 8 이상
MCP 서버 로깅
MCP 서버를 구현할 때는 로깅을 처리하는 방식에 주의해야 합니다.
STDIO 기반 서버: 표준 출력(stdout)에 쓰는 Console.WriteLine() 또는 Console.Write()을 절대 사용하지 마세요. stdout에 쓰면 JSON-RPC 메시지가 손상되어 서버가 작동하지 않습니다.
HTTP 기반 서버: 표준 출력 로깅은 HTTP 응답을 방해하지 않으므로 사용해도 됩니다.
모범 사례
- stderr 또는 파일에 기록하는 로깅 라이브러리를 사용합니다.
시스템 요구 사항
- .NET 8 SDK 이상이 설치되어 있어야 합니다.
환경 설정
먼저 dotnet이 설치되어 있지 않다면 설치하세요. dotnet는 Microsoft .NET 공식 웹사이트에서 다운로드할 수 있습니다. dotnet 설치를 확인합니다.
dotnet --version
이제 프로젝트를 만들고 설정합니다.
# Create a new directory for our project
mkdir weather
cd weather
# Initialize a new C# project
dotnet new console
# Create a new directory for our project
mkdir weather
cd weather
# Initialize a new C# project
dotnet new console
dotnet new console을 실행하면 새로운 C# 프로젝트가 만들어집니다.
Visual Studio나 Rider 등 선호하는 IDE에서 프로젝트를 열 수 있습니다.
또는 Visual Studio 프로젝트 마법사를 사용해 C# 애플리케이션을 만들 수 있습니다.
프로젝트를 만든 후 Model Context Protocol SDK 및 호스팅용 NuGet 패키지를 추가합니다.
# Add the Model Context Protocol SDK NuGet package
dotnet add package ModelContextProtocol --prerelease
# Add the .NET Hosting NuGet package
dotnet add package Microsoft.Extensions.Hosting
이제 서버 구축을 시작해 보겠습니다.
서버 구축하기
프로젝트의 Program.cs 파일을 열고 내용을 다음 코드로 바꿉니다.
using Microsoft.Extensions.DependencyInjection;
using Microsoft.Extensions.Hosting;
using ModelContextProtocol;
using System.Net.Http.Headers;

var builder = Host.CreateEmptyApplicationBuilder(settings: null);

builder.Services.AddMcpServer()
    .WithStdioServerTransport()
    .WithToolsFromAssembly();

builder.Services.AddSingleton(_ =>
{
    var client = new HttpClient() { BaseAddress = new Uri("https://api.weather.gov") };
    client.DefaultRequestHeaders.UserAgent.Add(new ProductInfoHeaderValue("weather-tool", "1.0"));
    return client;
});

var app = builder.Build();

await app.RunAsync();
이 코드는 Model Context Protocol SDK를 사용해 표준 입출력 트랜스포트 기반 MCP 서버를 만드는 기본 콘솔 애플리케이션을 설정합니다.
Weather API 헬퍼 함수
JSON 요청 처리를 단순화하는 HttpClient용 확장 클래스를 만듭니다.
using System.Text.Json;

internal static class HttpClientExt
{
    public static async Task<JsonDocument> ReadJsonDocumentAsync(this HttpClient client, string requestUri)
    {
        using var response = await client.GetAsync(requestUri);
        response.EnsureSuccessStatusCode();
        return await JsonDocument.ParseAsync(await response.Content.ReadAsStreamAsync());
    }
}
다음으로 National Weather Service API의 응답을 조회하고 변환하는 도구 실행 핸들러 클래스를 정의합니다.
using ModelContextProtocol.Server;
using System.ComponentModel;
using System.Globalization;
using System.Text.Json;

namespace QuickstartWeatherServer.Tools;

[McpServerToolType]
public static class WeatherTools
{
    [McpServerTool, Description("Get weather alerts for a US state code.")]
    public static async Task<string> GetAlerts(
        HttpClient client,
        [Description("The US state code to get alerts for.")] string state)
    {
        using var jsonDocument = await client.ReadJsonDocumentAsync($"/alerts/active/area/{state}");
        var jsonElement = jsonDocument.RootElement;
        var alerts = jsonElement.GetProperty("features").EnumerateArray();

        if (!alerts.Any())
        {
            return "No active alerts for this state.";
        }

        return string.Join("\n--\n", alerts.Select(alert =>
        {
            JsonElement properties = alert.GetProperty("properties");
            return $"""
                    Event: {properties.GetProperty("event").GetString()}
                    Area: {properties.GetProperty("areaDesc").GetString()}
                    Severity: {properties.GetProperty("severity").GetString()}
                    Description: {properties.GetProperty("description").GetString()}
                    Instruction: {properties.GetProperty("instruction").GetString()}
                    """;
        }));
    }

    [McpServerTool, Description("Get weather forecast for a location.")]
    public static async Task<string> GetForecast(
        HttpClient client,
        [Description("Latitude of the location.")] double latitude,
        [Description("Longitude of the location.")] double longitude)
    {
        var pointUrl = string.Create(CultureInfo.InvariantCulture, $"/points/{latitude},{longitude}");
        using var jsonDocument = await client.ReadJsonDocumentAsync(pointUrl);
        var forecastUrl = jsonDocument.RootElement.GetProperty("properties").GetProperty("forecast").GetString()
            ?? throw new Exception($"No forecast URL provided by {client.BaseAddress}points/{latitude},{longitude}");

        using var forecastDocument = await client.ReadJsonDocumentAsync(forecastUrl);
        var periods = forecastDocument.RootElement.GetProperty("properties").GetProperty("periods").EnumerateArray();

        return string.Join("\n---\n", periods.Select(period => $"""
                {period.GetProperty("name").GetString()}
                Temperature: {period.GetProperty("temperature").GetInt32()}°F
                Wind: {period.GetProperty("windSpeed").GetString()} {period.GetProperty("windDirection").GetString()}
                Forecast: {period.GetProperty("detailedForecast").GetString()}
                """));
    }
}
서버 실행하기
마지막으로 다음 명령을 사용해 서버를 실행합니다.
dotnet run
그러면 서버가 시작되어 표준 입출력으로 들어오는 요청을 수신합니다.
Claude Desktop으로 서버 테스트하기
먼저 Claude Desktop이 설치되어 있는지 확인하세요. 여기에서 최신 버전을
설치할 수 있습니다. Claude Desktop이 이미 설치되어 있다면 최신 버전으로 업데이트되어 있는지 확인하세요.
사용하려는 MCP 서버를 Claude Desktop에 설정해야 합니다. 텍스트 편집기에서 ~/Library/Application Support/Claude/claude_desktop_config.json에 있는 Claude Desktop 앱 구성 파일을 여세요. 파일이 없다면 새로 만드세요.
예를 들어 VS Code가 설치되어 있다면 다음과 같이 엽니다.
code ~/.config/Claude/claude_desktop_config.json
code ~/Library/Application\ Support/Claude/claude_desktop_config.json
code $env:AppData\Claude\claude_desktop_config.json
그런 다음 mcpServers 키에 서버를 추가합니다. 서버가 하나 이상 올바르게 구성되어 있어야 Claude Desktop에 MCP UI 요소가 표시됩니다.
여기서는 다음과 같이 날씨 서버 하나를 추가합니다.
{
  "mcpServers": {
    "weather": {
      "command": "dotnet",
      "args": ["run", "--project", "/ABSOLUTE/PATH/TO/PROJECT", "--no-build"]
    }
  }
}
{
  "mcpServers": {
    "weather": {
      "command": "dotnet",
      "args": [
        "run",
        "--project",
        "C:\\ABSOLUTE\\PATH\\TO\\PROJECT",
        "--no-build"
      ]
    }
  }
}
이 구성은 Claude Desktop에 다음 내용을 알려 줍니다.
- 이름이 "weather"인 MCP 서버가 있습니다.
dotnet run /ABSOLUTE/PATH/TO/PROJECT을 실행해 서버를 시작합니다. 파일을 저장하고 Claude Desktop을 다시 시작하세요.
날씨 서버 구축을 시작해 보겠습니다! 여기에서 이번에 구축할 전체 코드를 확인할 수 있습니다.
사전 지식
이 빠른 시작 가이드는 다음 항목에 익숙하다고 가정합니다.
- Ruby
- Claude와 같은 LLM
MCP 서버 로깅
MCP 서버를 구현할 때는 로깅을 처리하는 방식에 주의해야 합니다.
STDIO 기반 서버: 기본적으로 표준 출력(stdout)에 쓰는 puts 또는 print을 절대 사용하지 마세요. stdout에 쓰면 JSON-RPC 메시지가 손상되어 서버가 작동하지 않습니다.
HTTP 기반 서버: 표준 출력 로깅은 HTTP 응답을 방해하지 않으므로 사용해도 됩니다.
모범 사례
- stderr 또는 파일에 기록하는 로깅 라이브러리를 사용합니다.
빠른 예제
# ❌ Bad (STDIO)
puts "Processing request"

# ✅ Good (STDIO)
require "logger"
logger = Logger.new($stderr)
logger.info("Processing request")
시스템 요구 사항
- Ruby 2.7 이상이 설치되어 있어야 합니다.
환경 설정
먼저 Ruby가 설치되어 있는지 확인합니다. 다음 명령으로 확인할 수 있습니다.
ruby --version
이제 프로젝트를 만들고 설정해 보겠습니다.
# Create a new directory for our project
mkdir weather
cd weather

# Create a Gemfile
bundle init

# Add the MCP SDK dependency
bundle add mcp

# Create our server file
touch weather.rb
# Create a new directory for our project
mkdir weather
cd weather

# Create a Gemfile
bundle init

# Add the MCP SDK dependency
bundle add mcp

# Create our server file
new-item weather.rb
이제 서버 구축을 시작해 보겠습니다.
서버 구축하기
패키지 가져오기 및 상수 설정
weather.rb를 열고 맨 위에 다음 require와 상수를 추가합니다.
require "json"
require "mcp"
require "net/http"
require "uri"

NWS_API_BASE = "https://api.weather.gov"
USER_AGENT = "weather-app/1.0"
mcp gem은 서버 구현과 stdio 트랜스포트용 클래스를 포함한 Ruby용 Model Context Protocol SDK를 제공합니다.
헬퍼 메서드
다음으로 National Weather Service API의 데이터를 조회하고 형식을 지정하는 헬퍼 메서드를 추가합니다.
module HelperMethods
  def make_nws_request(url)
    uri = URI(url)
    request = Net::HTTP::Get.new(uri)
    request["User-Agent"] = USER_AGENT
    request["Accept"] = "application/geo+json"

    response = Net::HTTP.start(uri.hostname, uri.port, use_ssl: true) do |http|
      http.request(request)
    end

    raise "HTTP #{response.code}: #{response.message}" unless response.is_a?(Net::HTTPSuccess)

    JSON.parse(response.body)
  end

  def format_alert(feature)
    properties = feature["properties"]

    <<~ALERT
      Event: #{properties["event"] || "Unknown"}
      Area: #{properties["areaDesc"] || "Unknown"}
      Severity: #{properties["severity"] || "Unknown"}
      Description: #{properties["description"] || "No description available"}
      Instructions: #{properties["instruction"] || "No specific instructions provided"}
    ALERT
  end
end
도구 실행 구현하기
이제 도구 클래스를 정의합니다. 각 도구는 MCP::Tool을 상속하고 도구 로직을 구현합니다.
class GetAlerts < MCP::Tool
  extend HelperMethods

  tool_name "get_alerts"
  description "Get weather alerts for a US state"
  input_schema(
    properties: {
      state: {
        type: "string",
        description: "Two-letter US state code (e.g. CA, NY)"
      }
    },
    required: ["state"]
  )

  def self.call(state:)
    url = "#{NWS_API_BASE}/alerts/active/area/#{state.upcase}"
    data = make_nws_request(url)

    if data["features"].empty?
      return MCP::Tool::Response.new([{
        type: "text",
        text: "No active alerts for this state."
      }])
    end

    alerts = data["features"].map { |feature| format_alert(feature) }
    MCP::Tool::Response.new([{
      type: "text",
      text: alerts.join("\n---\n")
    }])
  end
end

class GetForecast < MCP::Tool
  extend HelperMethods

  tool_name "get_forecast"
  description "Get weather forecast for a location"
  input_schema(
    properties: {
      latitude: {
        type: "number",
        description: "Latitude of the location"
      },
      longitude: {
        type: "number",
        description: "Longitude of the location"
      }
    },
    required: ["latitude", "longitude"]
  )

  def self.call(latitude:, longitude:)
    # First get the forecast grid endpoint.
    points_url = "#{NWS_API_BASE}/points/#{latitude},#{longitude}"
    points_data = make_nws_request(points_url)

    # Get the forecast URL from the points response.
    forecast_url = points_data["properties"]["forecast"]
    forecast_data = make_nws_request(forecast_url)

    # Format the periods into a readable forecast.
    periods = forecast_data["properties"]["periods"]
    forecasts = periods.first(5).map do |period|
      <<~FORECAST
        #{period["name"]}:
        Temperature: #{period["temperature"]}°#{period["temperatureUnit"]}
        Wind: #{period["windSpeed"]} #{period["windDirection"]}
        Forecast: #{period["detailedForecast"]}
      FORECAST
    end

    MCP::Tool::Response.new([{
      type: "text",
      text: forecasts.join("\n---\n")
    }])
  end
end
서버 실행하기
마지막으로 서버를 초기화하고 실행합니다.
server = MCP::Server.new(
  name: "weather",
  version: "1.0.0",
  tools: [GetAlerts, GetForecast]
)

transport = MCP::Server::Transports::StdioTransport.new(server)
transport.open
서버가 완성되었습니다! bundle exec ruby weather.rb를 실행하여 MCP 서버를 시작하면 MCP 호스트에서 오는 메시지를 수신합니다.
이제 기존 MCP 호스트인 Claude Desktop에서 서버를 테스트해 보겠습니다.
Claude Desktop으로 서버 테스트하기
먼저 Claude Desktop이 설치되어 있는지 확인하세요. 여기에서 최신 버전을 설치할 수 있습니다. Claude Desktop이 이미 설치되어 있다면 최신 버전으로 업데이트되어 있는지 확인하세요.
사용하려는 MCP 서버를 Claude Desktop에 설정해야 합니다. 텍스트 편집기에서 ~/Library/Application Support/Claude/claude_desktop_config.json에 있는 Claude Desktop 앱 구성 파일을 여세요. 파일이 없다면 새로 만드세요.
예를 들어 VS Code가 설치되어 있다면 다음과 같이 엽니다.
code ~/.config/Claude/claude_desktop_config.json
code ~/Library/Application\ Support/Claude/claude_desktop_config.json
code $env:AppData\Claude\claude_desktop_config.json
그런 다음 mcpServers 키에 서버를 추가합니다. 서버가 하나 이상 올바르게 구성되어 있어야 Claude Desktop에 MCP UI 요소가 표시됩니다.
여기서는 다음과 같이 날씨 서버 하나를 추가합니다.
{
  "mcpServers": {
    "weather": {
      "command": "bundle",
      "args": ["exec", "ruby", "weather.rb"],
      "cwd": "/ABSOLUTE/PATH/TO/PARENT/FOLDER/weather"
    }
  }
}
{
  "mcpServers": {
    "weather": {
      "command": "bundle",
      "args": ["exec", "ruby", "weather.rb"],
      "cwd": "C:\\ABSOLUTE\\PATH\\TO\\PARENT\\FOLDER\\weather"
    }
  }
}
이 구성은 Claude Desktop에 다음 내용을 알려 줍니다.
- 이름이 "weather"인 MCP 서버가 있습니다.
- 지정한 디렉터리에서
bundle exec ruby weather.rb를 실행해 서버를 시작합니다.
파일을 저장하고 Claude Desktop을 다시 시작하세요.
날씨 서버 구축을 시작해 보겠습니다! 여기에서 이번에 구축할 전체 코드를 확인할 수 있습니다.
사전 지식
이 빠른 시작 가이드는 다음 항목에 익숙하다고 가정합니다.
- Rust 프로그래밍 언어
- Rust의 async/await
- Claude와 같은 LLM
MCP 서버 로깅
MCP 서버를 구현할 때는 로깅을 처리하는 방식에 주의해야 합니다.
STDIO 기반 서버: 표준 출력(stdout)에 쓰는 println!() 또는 print!()을 절대 사용하지 마세요. stdout에 쓰면 JSON-RPC 메시지가 손상되어 서버가 작동하지 않습니다.
HTTP 기반 서버: 표준 출력 로깅은 HTTP 응답을 방해하지 않으므로 사용해도 됩니다.
모범 사례
- Rust에서는
tracing또는log처럼 stderr나 파일에 기록하는 로깅 라이브러리를 사용합니다. - 로깅 프레임워크가 stdout에 출력하지 않도록 구성합니다.
빠른 예제
// ❌ Bad (STDIO)
println!("Processing request");

// ✅ Good (STDIO)
eprintln!("Processing request"); // writes to stderr
시스템 요구 사항
- Rust 1.70 이상이 설치되어 있어야 합니다.
- Cargo(Rust 설치에 포함됨)
환경 설정
Rust가 설치되어 있지 않다면 먼저 rust-lang.org에서 설치합니다.
curl --proto '=https' --tlsv1.2 -sSf https://sh.rustup.rs | sh
# Download and run rustup-init.exe from https://rustup.rs/
Rust 설치를 확인합니다.
rustc --version
cargo --version
이제 프로젝트를 만들고 설정해 보겠습니다.
# Create a new Rust project
cargo new weather
cd weather
# Create a new Rust project
cargo new weather
cd weather
필요한 의존성을 추가하도록 Cargo.toml을 업데이트합니다.
[package]
name = "weather"
version = "0.1.0"
edition = "2024"

[dependencies]
rmcp = { version = "0.3", features = ["server", "macros", "transport-io"] }
tokio = { version = "1.46", features = ["full"] }
reqwest = { version = "0.12", features = ["json"] }
serde = { version = "1.0", features = ["derive"] }
serde_json = "1.0"
anyhow = "1.0"
tracing = "0.1"
tracing-subscriber = { version = "0.3", features = ["env-filter", "std", "fmt"] }
이제 서버 구축을 시작해 보겠습니다.
서버 구축하기
패키지 및 상수 가져오기
src/main.rs를 열고 맨 위에 다음 import와 상수를 추가합니다.
use anyhow::Result;
use rmcp::{
    ServerHandler, ServiceExt,
    handler::server::{router::tool::ToolRouter, tool::Parameters},
    model::*,
    schemars, tool, tool_handler, tool_router,
};
use serde::Deserialize;
use serde::de::DeserializeOwned;

const NWS_API_BASE: &str = "https://api.weather.gov";
const USER_AGENT: &str = "weather-app/1.0";
rmcp crate는 서버 구현, 절차적 매크로, stdio 트랜스포트 기능을 포함한 Rust용 Model Context Protocol SDK를 제공합니다.
데이터 구조
다음으로 National Weather Service API 응답을 역직렬화할 데이터 구조를 정의합니다.
#[derive(Debug, Deserialize)]
struct AlertsResponse {
    features: Vec<AlertFeature>,
}

#[derive(Debug, Deserialize)]
struct AlertFeature {
    properties: AlertProperties,
}

#[derive(Debug, Deserialize)]
struct AlertProperties {
    event: Option<String>,
    #[serde(rename = "areaDesc")]
    area_desc: Option<String>,
    severity: Option<String>,
    description: Option<String>,
    instruction: Option<String>,
}

#[derive(Debug, Deserialize)]
struct PointsResponse {
    properties: PointsProperties,
}

#[derive(Debug, Deserialize)]
struct PointsProperties {
    forecast: String,
}

#[derive(Debug, Deserialize)]
struct ForecastResponse {
    properties: ForecastProperties,
}

#[derive(Debug, Deserialize)]
struct ForecastProperties {
    periods: Vec<ForecastPeriod>,
}

#[derive(Debug, Deserialize)]
struct ForecastPeriod {
    name: String,
    temperature: i32,
    #[serde(rename = "temperatureUnit")]
    temperature_unit: String,
    #[serde(rename = "windSpeed")]
    wind_speed: String,
    #[serde(rename = "windDirection")]
    wind_direction: String,
    #[serde(rename = "detailedForecast")]
    detailed_forecast: String,
}
이제 MCP 클라이언트가 전송할 요청 타입을 정의합니다.
#[derive(serde::Deserialize, schemars::JsonSchema)]
pub struct MCPForecastRequest {
    latitude: f32,
    longitude: f32,
}

#[derive(serde::Deserialize, schemars::JsonSchema)]
pub struct MCPAlertRequest {
    state: String,
}
헬퍼 함수
API 요청을 만들고 응답 형식을 지정하는 헬퍼 함수를 추가합니다.
async fn make_nws_request<T: DeserializeOwned>(url: &str) -> Result<T> {
    let client = reqwest::Client::new();
    let rsp = client
        .get(url)
        .header(reqwest::header::USER_AGENT, USER_AGENT)
        .header(reqwest::header::ACCEPT, "application/geo+json")
        .send()
        .await?
        .error_for_status()?;
    Ok(rsp.json::<T>().await?)
}

fn format_alert(feature: &AlertFeature) -> String {
    let props = &feature.properties;
    format!(
        "Event: {}\nArea: {}\nSeverity: {}\nDescription: {}\nInstructions: {}",
        props.event.as_deref().unwrap_or("Unknown"),
        props.area_desc.as_deref().unwrap_or("Unknown"),
        props.severity.as_deref().unwrap_or("Unknown"),
        props
            .description
            .as_deref()
            .unwrap_or("No description available"),
        props
            .instruction
            .as_deref()
            .unwrap_or("No specific instructions provided")
    )
}

fn format_period(period: &ForecastPeriod) -> String {
    format!(
        "{}:\nTemperature: {}°{}\nWind: {} {}\nForecast: {}",
        period.name,
        period.temperature,
        period.temperature_unit,
        period.wind_speed,
        period.wind_direction,
        period.detailed_forecast
    )
}
날씨 서버와 도구 구현하기
이제 도구 핸들러와 함께 기본 Weather 서버 구조체를 구현합니다.
pub struct Weather {
    tool_router: ToolRouter<Weather>,
}

#[tool_router]
impl Weather {
    fn new() -> Self {
        Self {
            tool_router: Self::tool_router(),
        }
    }

    #[tool(description = "Get weather alerts for a US state.")]
    async fn get_alerts(
        &self,
        Parameters(MCPAlertRequest { state }): Parameters<MCPAlertRequest>,
    ) -> String {
        let url = format!(
            "{}/alerts/active/area/{}",
            NWS_API_BASE,
            state.to_uppercase()
        );

        match make_nws_request::<AlertsResponse>(&url).await {
            Ok(data) => {
                if data.features.is_empty() {
                    "No active alerts for this state.".to_string()
                } else {
                    data.features
                        .iter()
                        .map(format_alert)
                        .collect::<Vec<_>>()
                        .join("\n---\n")
                }
            }
            Err(_) => "Unable to fetch alerts or no alerts found.".to_string(),
        }
    }

    #[tool(description = "Get weather forecast for a location.")]
    async fn get_forecast(
        &self,
        Parameters(MCPForecastRequest {
            latitude,
            longitude,
        }): Parameters<MCPForecastRequest>,
    ) -> String {
        let points_url = format!("{NWS_API_BASE}/points/{latitude},{longitude}");
        let Ok(points_data) = make_nws_request::<PointsResponse>(&points_url).await else {
            return "Unable to fetch forecast data for this location.".to_string();
        };

        let forecast_url = points_data.properties.forecast;

        let Ok(forecast_data) = make_nws_request::<ForecastResponse>(&forecast_url).await else {
            return "Unable to fetch forecast data for this location.".to_string();
        };

        let periods = &forecast_data.properties.periods;
        let forecast_summary: String = periods
            .iter()
            .take(5) // Next 5 periods only
            .map(format_period)
            .collect::<Vec<String>>()
            .join("\n---\n");
        forecast_summary
    }
}
#[tool_router] 매크로는 라우팅 로직을 자동으로 생성하고, #[tool] 속성은 메서드를 MCP 도구로 표시합니다.
ServerHandler 구현하기
서버 기능을 정의하도록 ServerHandler 트레이트를 구현합니다.
#[tool_handler]
impl ServerHandler for Weather {
    fn get_info(&self) -> ServerInfo {
        ServerInfo {
            capabilities: ServerCapabilities::builder().enable_tools().build(),
            ..Default::default()
        }
    }
}
서버 실행하기
마지막으로 stdio 트랜스포트로 서버를 실행하는 main 함수를 구현합니다.
#[tokio::main]
async fn main() -> Result<()> {
    let transport = (tokio::io::stdin(), tokio::io::stdout());
    let service = Weather::new().serve(transport).await?;
    service.waiting().await?;
    Ok(())
}
다음 명령으로 서버를 빌드합니다.
cargo build --release
컴파일된 바이너리는 target/release/weather에 생성됩니다.
이제 기존 MCP 호스트인 Claude Desktop에서 서버를 테스트해 보겠습니다.
Claude Desktop으로 서버 테스트하기
먼저 Claude Desktop이 설치되어 있는지 확인하세요. 여기에서 최신 버전을 설치할 수 있습니다. Claude Desktop이 이미 설치되어 있다면 최신 버전으로 업데이트되어 있는지 확인하세요.
사용하려는 MCP 서버를 Claude Desktop에 설정해야 합니다. 텍스트 편집기에서 ~/Library/Application Support/Claude/claude_desktop_config.json에 있는 Claude Desktop 앱 구성 파일을 여세요. 파일이 없다면 새로 만드세요.
예를 들어 VS Code가 설치되어 있다면 다음과 같이 엽니다.
code ~/.config/Claude/claude_desktop_config.json
code ~/Library/Application\ Support/Claude/claude_desktop_config.json
code $env:AppData\Claude\claude_desktop_config.json
그런 다음 mcpServers 키에 서버를 추가합니다. 서버가 하나 이상 올바르게 구성되어 있어야 Claude Desktop에 MCP UI 요소가 표시됩니다.
여기서는 다음과 같이 날씨 서버 하나를 추가합니다.
{
  "mcpServers": {
    "weather": {
      "command": "/ABSOLUTE/PATH/TO/PARENT/FOLDER/weather/target/release/weather"
    }
  }
}
{
  "mcpServers": {
    "weather": {
      "command": "C:\\ABSOLUTE\\PATH\\TO\\PARENT\\FOLDER\\weather\\target\\release\\weather.exe"
    }
  }
}
이 구성은 Claude Desktop에 다음 내용을 알려 줍니다.
- 이름이 "weather"인 MCP 서버가 있습니다.
- 지정한 경로의 컴파일된 바이너리를 실행해 서버를 시작합니다.
파일을 저장하고 Claude Desktop을 다시 시작하세요.
날씨 서버 구축을 시작해 보겠습니다! 여기에서 이번에 구축할 전체 코드를 확인할 수 있습니다.
사전 지식
이 빠른 시작 가이드는 다음 항목에 익숙하다고 가정합니다.
- Go
- Claude와 같은 LLM
MCP 서버 로깅
MCP 서버를 구현할 때는 로깅을 처리하는 방식에 주의해야 합니다.
STDIO 기반 서버: 표준 출력(stdout)에 쓰는 fmt.Println() 또는 fmt.Printf()을 절대 사용하지 마세요. stdout에 쓰면 JSON-RPC 메시지가 손상되어 서버가 작동하지 않습니다.
HTTP 기반 서버: 표준 출력 로깅은 HTTP 응답을 방해하지 않으므로 사용해도 됩니다.
모범 사례
- 기본적으로 stderr에 쓰는
log.Println()이나 stderr 또는 파일에 기록하는 로깅 라이브러리를 사용합니다. - stderr에 명시적으로 쓰려면
fmt.Fprintf(os.Stderr, ...)을 사용합니다.
빠른 예제
// ❌ Bad (STDIO)
fmt.Println("Processing request")

// ✅ Good (STDIO)
log.Println("Processing request") // defaults to stderr

// ✅ Good (STDIO)
fmt.Fprintln(os.Stderr, "Processing request")
시스템 요구 사항
- Go 1.24 이상이 설치되어 있어야 합니다.
환경 설정
Go가 설치되어 있지 않다면 먼저 go.dev에서 다운로드하여 설치합니다.
Go 설치를 확인합니다.
go version
이제 프로젝트를 만들고 설정해 보겠습니다.
# Create a new directory for our project
mkdir weather
cd weather

# Initialize Go module
go mod init weather

# Install dependencies
go get github.com/modelcontextprotocol/go-sdk/mcp

# Create our server file
touch main.go
# Create a new directory for our project
md weather
cd weather

# Initialize Go module
go mod init weather

# Install dependencies
go get github.com/modelcontextprotocol/go-sdk/mcp

# Create our server file
new-item main.go
이제 서버 구축을 시작해 보겠습니다.
서버 구축하기
패키지 및 상수 가져오기
main.go 파일 맨 위에 다음 내용을 추가합니다.
package main

import (
	"cmp"
	"context"
	"encoding/json"
	"fmt"
	"io"
	"log"
	"net/http"
	"strings"

	"github.com/modelcontextprotocol/go-sdk/mcp"
)

const (
	NWSAPIBase = "https://api.weather.gov"
	UserAgent  = "weather-app/1.0"
)
데이터 구조
다음으로 도구에서 사용할 데이터 구조를 정의합니다.
type PointsResponse struct {
	Properties struct {
		Forecast string `json:"forecast"`
	} `json:"properties"`
}

type ForecastResponse struct {
	Properties struct {
		Periods []ForecastPeriod `json:"periods"`
	} `json:"properties"`
}

type ForecastPeriod struct {
	Name             string `json:"name"`
	Temperature      int    `json:"temperature"`
	TemperatureUnit  string `json:"temperatureUnit"`
	WindSpeed        string `json:"windSpeed"`
	WindDirection    string `json:"windDirection"`
	DetailedForecast string `json:"detailedForecast"`
}

type AlertsResponse struct {
	Features []AlertFeature `json:"features"`
}

type AlertFeature struct {
	Properties AlertProperties `json:"properties"`
}

type AlertProperties struct {
	Event       string `json:"event"`
	AreaDesc    string `json:"areaDesc"`
	Severity    string `json:"severity"`
	Description string `json:"description"`
	Instruction string `json:"instruction"`
}

type ForecastInput struct {
	Latitude  float64 `json:"latitude" jsonschema:"Latitude of the location"`
	Longitude float64 `json:"longitude" jsonschema:"Longitude of the location"`
}

type AlertsInput struct {
	State string `json:"state" jsonschema:"Two-letter US state code (e.g. CA, NY)"`
}
헬퍼 함수
다음으로 National Weather Service API의 데이터를 조회하고 형식을 지정하는 헬퍼 함수를 추가합니다.
func makeNWSRequest[T any](ctx context.Context, url string) (*T, error) {
	req, err := http.NewRequestWithContext(ctx, http.MethodGet, url, nil)
	if err != nil {
		return nil, fmt.Errorf("failed to create request: %w", err)
	}

	req.Header.Set("User-Agent", UserAgent)
	req.Header.Set("Accept", "application/geo+json")

	client := http.DefaultClient
	resp, err := client.Do(req)
	if err != nil {
		return nil, fmt.Errorf("failed to make request to %s: %w", url, err)
	}
	defer resp.Body.Close()

	if resp.StatusCode != http.StatusOK {
		body, _ := io.ReadAll(resp.Body)
		return nil, fmt.Errorf("HTTP error %d: %s", resp.StatusCode, string(body))
	}

	var result T
	if err := json.NewDecoder(resp.Body).Decode(&result); err != nil {
		return nil, fmt.Errorf("failed to decode response: %w", err)
	}

	return &result, nil
}

func formatAlert(alert AlertFeature) string {
	props := alert.Properties
	event := cmp.Or(props.Event, "Unknown")
	areaDesc := cmp.Or(props.AreaDesc, "Unknown")
	severity := cmp.Or(props.Severity, "Unknown")
	description := cmp.Or(props.Description, "No description available")
	instruction := cmp.Or(props.Instruction, "No specific instructions provided")

	return fmt.Sprintf(`
Event: %s
Area: %s
Severity: %s
Description: %s
Instructions: %s
`, event, areaDesc, severity, description, instruction)
}

func formatPeriod(period ForecastPeriod) string {
	return fmt.Sprintf(`
%s:
Temperature: %d°%s
Wind: %s %s
Forecast: %s
`, period.Name, period.Temperature, period.TemperatureUnit,
		period.WindSpeed, period.WindDirection, period.DetailedForecast)
}
도구 실행 구현하기
도구 실행 핸들러는 각 도구의 로직을 실제로 실행합니다. 이제 이를 추가해 보겠습니다.
func getForecast(ctx context.Context, req *mcp.CallToolRequest, input ForecastInput) (
	*mcp.CallToolResult, any, error,
) {
	// Get points data
	pointsURL := fmt.Sprintf("%s/points/%f,%f", NWSAPIBase, input.Latitude, input.Longitude)
	pointsData, err := makeNWSRequest[PointsResponse](ctx, pointsURL)
	if err != nil {
		return &mcp.CallToolResult{
			Content: []mcp.Content{
				&mcp.TextContent{Text: "Unable to fetch forecast data for this location."},
			},
		}, nil, nil
	}

	// Get forecast data
	forecastURL := pointsData.Properties.Forecast
	if forecastURL == "" {
		return &mcp.CallToolResult{
			Content: []mcp.Content{
				&mcp.TextContent{Text: "Unable to fetch forecast URL."},
			},
		}, nil, nil
	}

	forecastData, err := makeNWSRequest[ForecastResponse](ctx, forecastURL)
	if err != nil {
		return &mcp.CallToolResult{
			Content: []mcp.Content{
				&mcp.TextContent{Text: "Unable to fetch detailed forecast."},
			},
		}, nil, nil
	}

	// Format the periods
	periods := forecastData.Properties.Periods
	if len(periods) == 0 {
		return &mcp.CallToolResult{
			Content: []mcp.Content{
				&mcp.TextContent{Text: "No forecast periods available."},
			},
		}, nil, nil
	}

	// Show next 5 periods
	var forecasts []string
	for i := range min(5, len(periods)) {
		forecasts = append(forecasts, formatPeriod(periods[i]))
	}

	result := strings.Join(forecasts, "\n---\n")

	return &mcp.CallToolResult{
		Content: []mcp.Content{
			&mcp.TextContent{Text: result},
		},
	}, nil, nil
}

func getAlerts(ctx context.Context, req *mcp.CallToolRequest, input AlertsInput) (
	*mcp.CallToolResult, any, error,
) {
	// Build alerts URL
	stateCode := strings.ToUpper(input.State)
	alertsURL := fmt.Sprintf("%s/alerts/active/area/%s", NWSAPIBase, stateCode)

	alertsData, err := makeNWSRequest[AlertsResponse](ctx, alertsURL)
	if err != nil {
		return &mcp.CallToolResult{
			Content: []mcp.Content{
				&mcp.TextContent{Text: "Unable to fetch alerts or no alerts found."},
			},
		}, nil, nil
	}

	// Check if there are any alerts
	if len(alertsData.Features) == 0 {
		return &mcp.CallToolResult{
			Content: []mcp.Content{
				&mcp.TextContent{Text: "No active alerts for this state."},
			},
		}, nil, nil
	}

	// Format alerts
	var alerts []string
	for _, feature := range alertsData.Features {
		alerts = append(alerts, formatAlert(feature))
	}

	result := strings.Join(alerts, "\n---\n")

	return &mcp.CallToolResult{
		Content: []mcp.Content{
			&mcp.TextContent{Text: result},
		},
	}, nil, nil
}
서버 실행하기
마지막으로 서버를 실행할 main 함수를 구현합니다.
func main() {
	// Create MCP server
	server := mcp.NewServer(&mcp.Implementation{
		Name:    "weather",
		Version: "1.0.0",
	}, nil)

	// Add get_forecast tool
	mcp.AddTool(server, &mcp.Tool{
		Name:        "get_forecast",
		Description: "Get weather forecast for a location",
	}, getForecast)

	// Add get_alerts tool
	mcp.AddTool(server, &mcp.Tool{
		Name:        "get_alerts",
		Description: "Get weather alerts for a US state",
	}, getAlerts)

	// Run server on stdio transport
	if err := server.Run(context.Background(), &mcp.StdioTransport{}); err != nil {
		log.Fatal(err)
	}
}
다음 명령으로 서버를 빌드합니다.
go build -o weather .
컴파일된 바이너리는 ./weather에 생성됩니다.
이제 기존 MCP 호스트인 Claude Desktop에서 서버를 테스트해 보겠습니다.
Claude Desktop으로 서버 테스트하기
먼저 Claude Desktop이 설치되어 있는지 확인하세요. 여기에서 최신 버전을 설치할 수 있습니다. Claude Desktop이 이미 설치되어 있다면 최신 버전으로 업데이트되어 있는지 확인하세요.
사용하려는 MCP 서버를 Claude Desktop에 설정해야 합니다. 텍스트 편집기에서 ~/Library/Application Support/Claude/claude_desktop_config.json에 있는 Claude Desktop 앱 구성 파일을 여세요. 파일이 없다면 새로 만드세요.
예를 들어 VS Code가 설치되어 있다면 다음과 같이 엽니다.
code ~/.config/Claude/claude_desktop_config.json
code ~/Library/Application\ Support/Claude/claude_desktop_config.json
code $env:AppData\Claude\claude_desktop_config.json
그런 다음 mcpServers 키에 서버를 추가합니다. 서버가 하나 이상 올바르게 구성되어 있어야 Claude Desktop에 MCP UI 요소가 표시됩니다.
여기서는 다음과 같이 날씨 서버 하나를 추가합니다.
{
  "mcpServers": {
    "weather": {
      "command": "/ABSOLUTE/PATH/TO/PARENT/FOLDER/weather/weather"
    }
  }
}
{
  "mcpServers": {
    "weather": {
      "command": "C:\\ABSOLUTE\\PATH\\TO\\PARENT\\FOLDER\\weather\\weather.exe"
    }
  }
}
이 구성은 Claude Desktop에 다음 내용을 알려 줍니다.
- 이름이 "weather"인 MCP 서버가 있습니다.
- 지정한 경로의 컴파일된 바이너리를 실행해 서버를 시작합니다.
파일을 저장하고 Claude Desktop을 다시 시작하세요.
명령으로 테스트하기
weather 서버가 제공하는 두 도구를 Claude Desktop이 인식하는지 확인해 보겠습니다. "파일, 커넥터 및 기타 항목 추가 /"  아이콘을 찾으면 됩니다.

더하기 아이콘을 클릭한 후 "Connectors" 메뉴 위에 마우스를 올리세요. 목록에 weather 서버가 표시되어야 합니다.
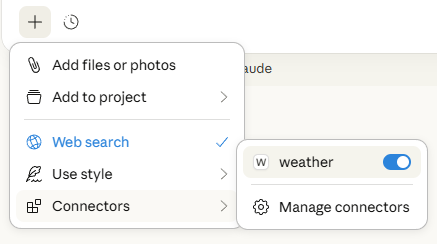
Claude Desktop이 서버를 인식하지 못한다면 디버깅 도움말은 문제 해결 섹션을 참조하세요.
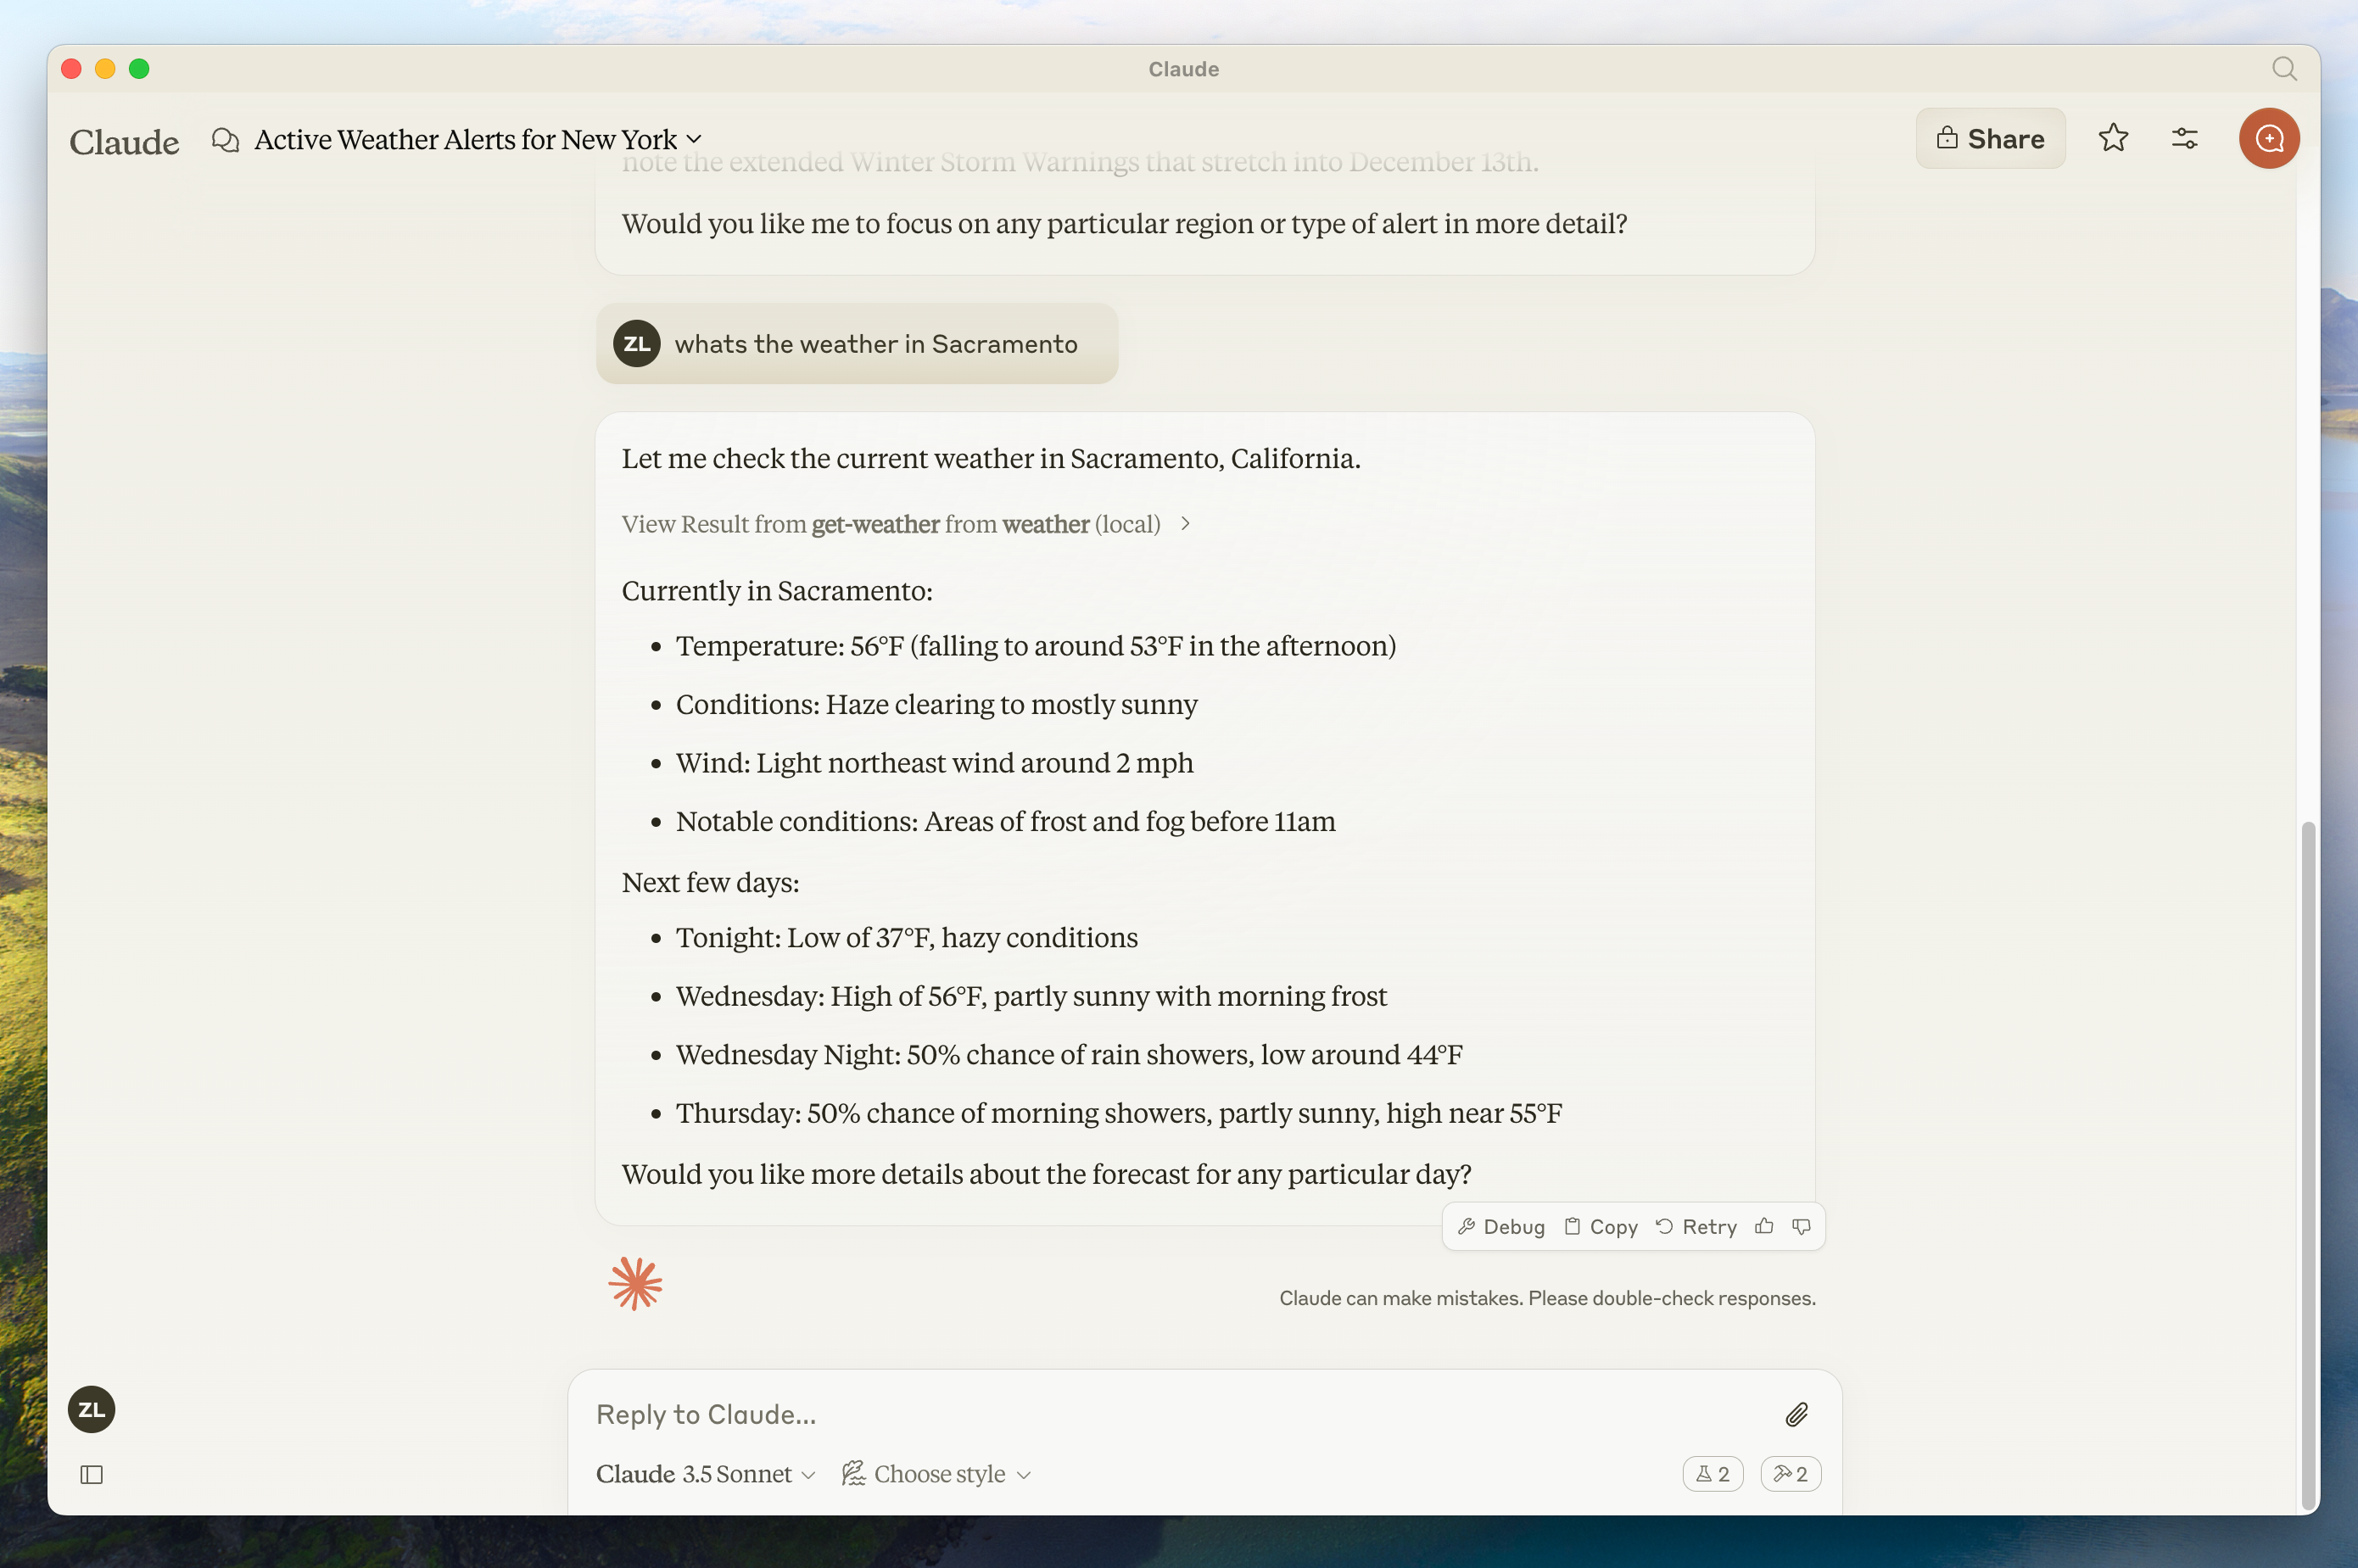
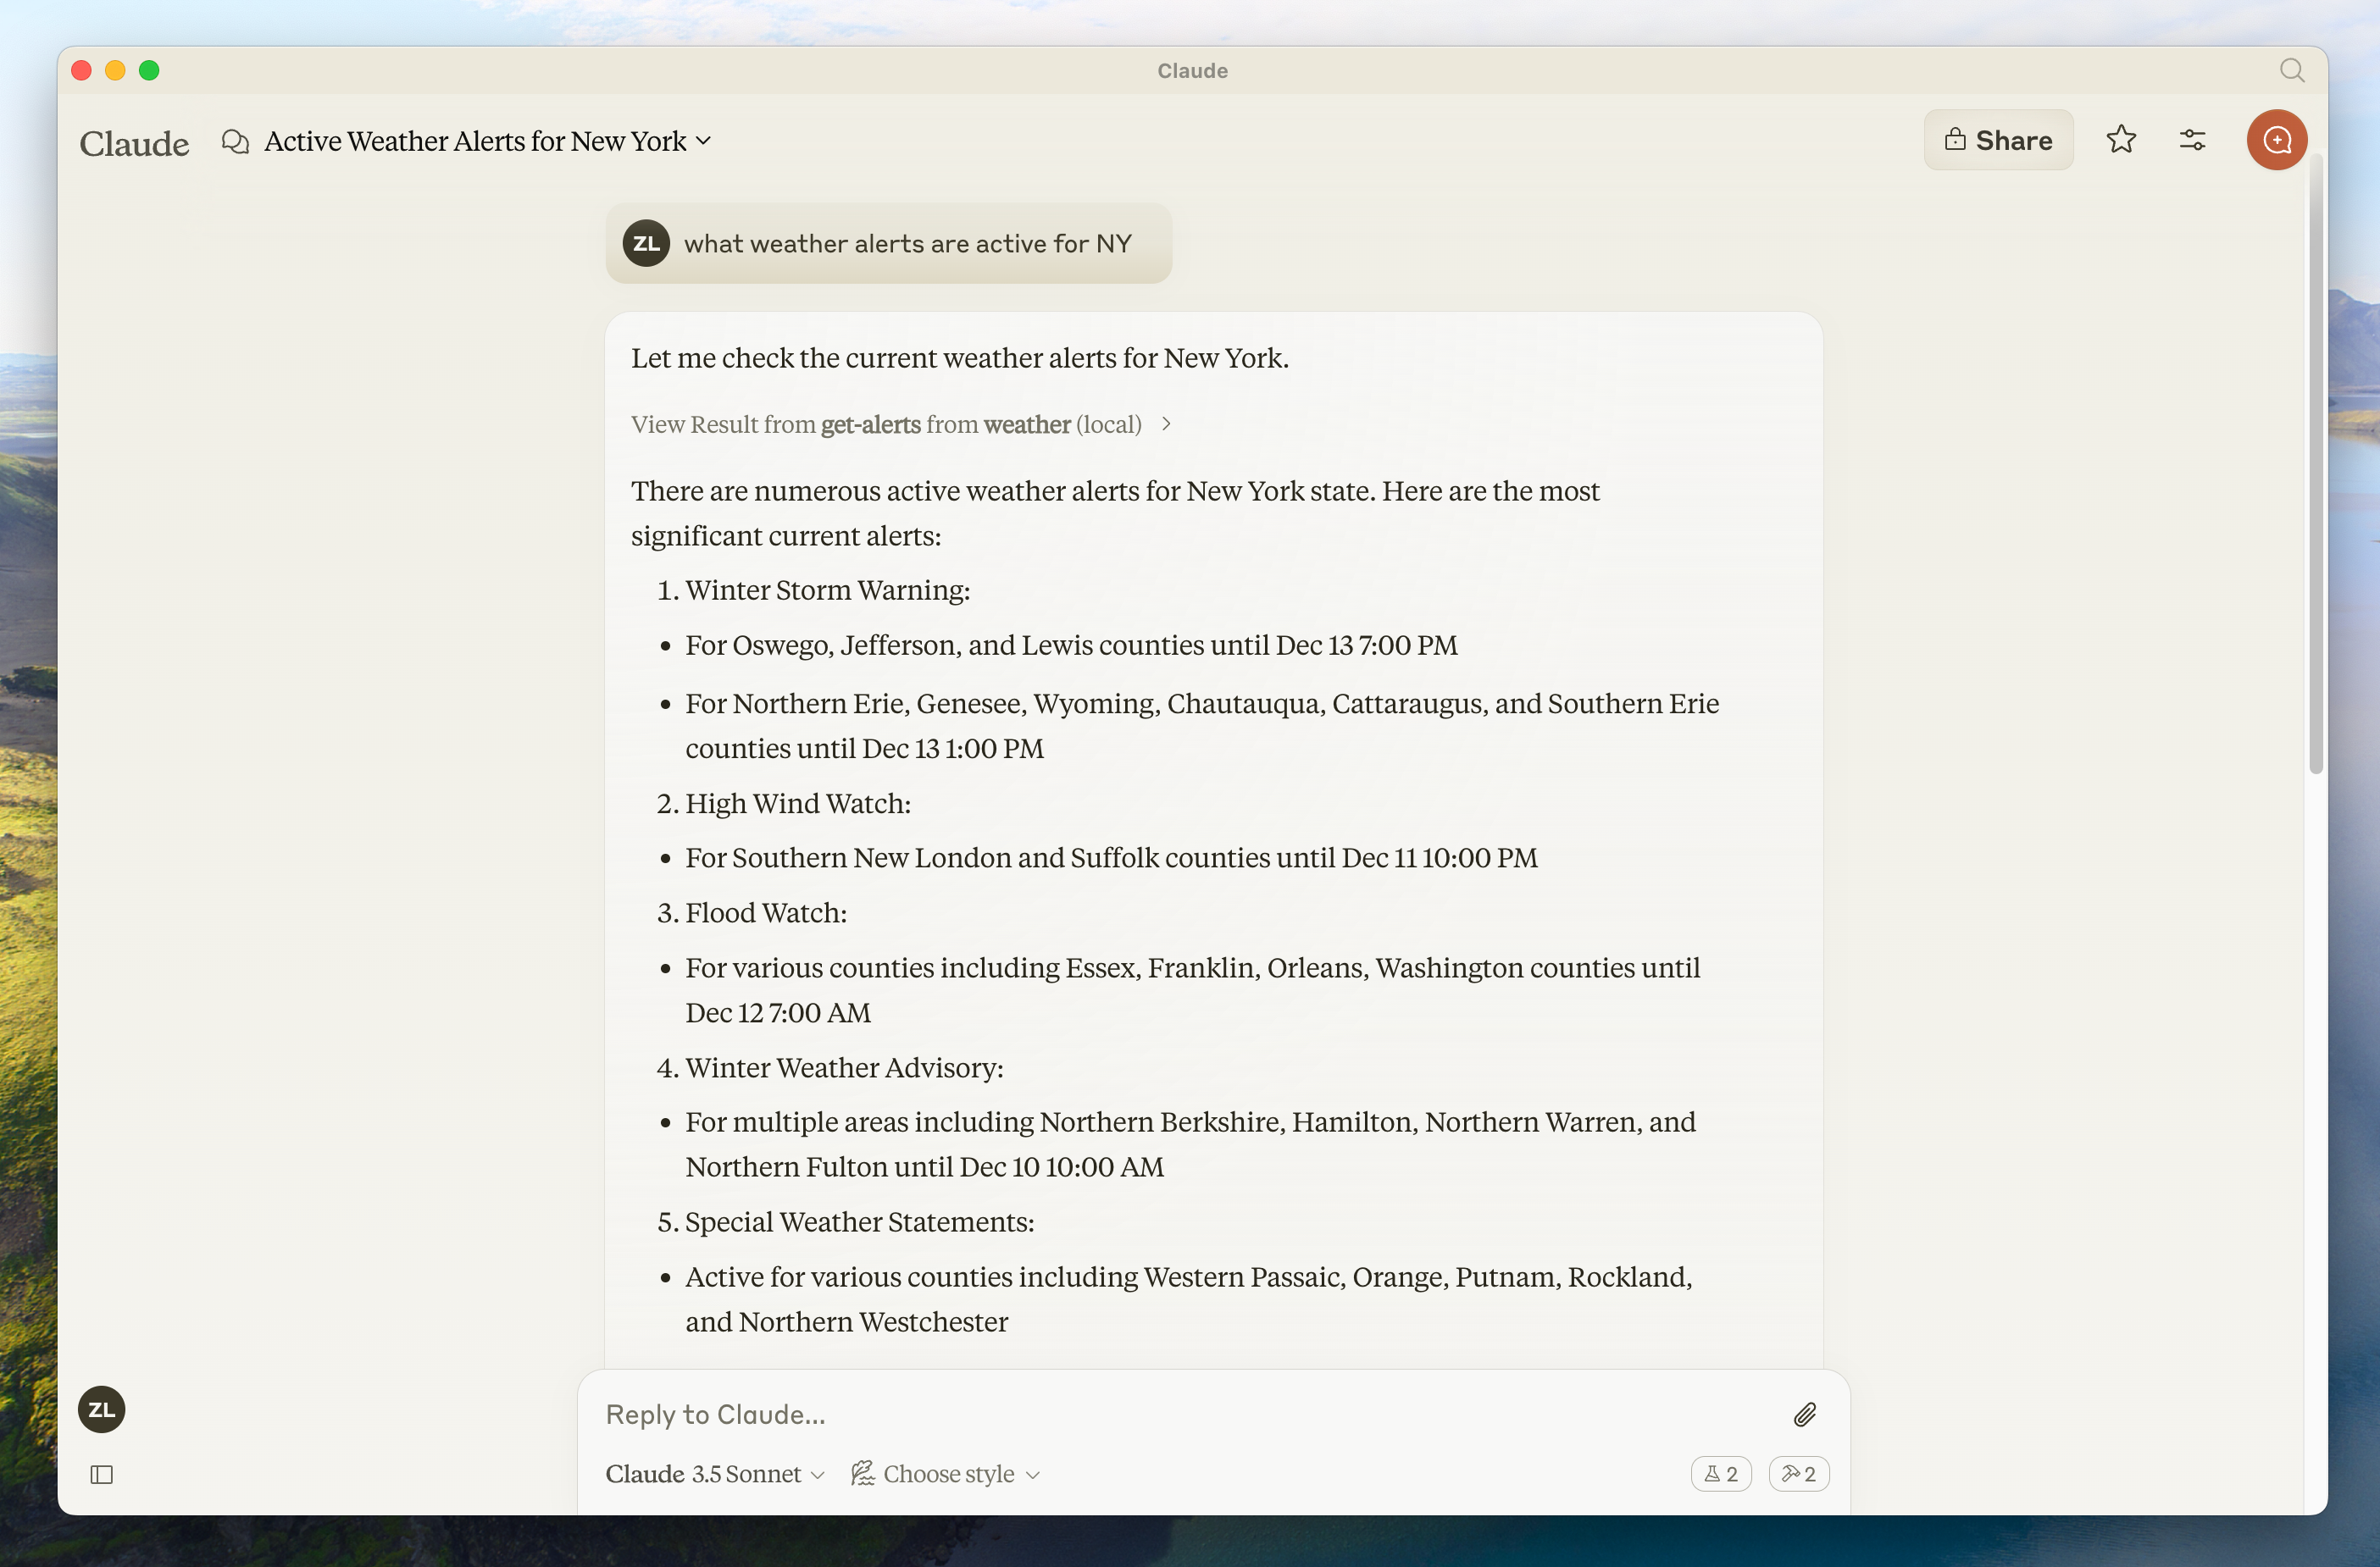
서버가 "Connectors" 메뉴에 표시되면 Claude Desktop에서 다음 명령을 실행해 서버를 테스트할 수 있습니다.
- 새크라멘토의 날씨는 어때?
- 텍사스에 현재 발효 중인 기상 특보가 있나요?
내부 동작 방식
질문하면 다음 과정이 진행됩니다.
- 클라이언트가 사용자의 질문을 Claude에 전송합니다.
- Claude가 사용 가능한 도구를 분석하고 사용할 도구를 결정합니다.
- 클라이언트가 MCP 서버를 통해 선택한 도구를 실행합니다.
- 결과가 Claude로 다시 전송됩니다.
- Claude가 자연어 응답을 작성합니다.
- 응답이 사용자에게 표시됩니다!
문제 해결
Claude Desktop 통합 문제
Claude Desktop 로그 확인하기
Claude.app의 MCP 관련 로그는 ~/Library/Logs/Claude(macOS) 또는 ~/.config/Claude/logs/(Linux)의 로그 파일에 기록됩니다.
mcp.log에는 MCP 연결 및 연결 실패에 관한 일반 로그가 포함됩니다.mcp-server-SERVERNAME.log형식의 파일에는 해당 서버의 stderr 출력이 포함됩니다. Stdio 서버는 모든 로그에 stderr를 사용할 수 있으므로 이 파일에는 오류만 기록되는 것은 아닙니다.
다음 명령을 실행하면 최근 로그를 나열하고 새 로그를 계속 확인할 수 있습니다.
# Check Claude's logs for errors
tail -n 20 -f ~/Library/Logs/Claude/mcp*.log
# Check Claude's logs for errors
tail -n 20 -f ~/.config/Claude/logs/mcp*.log
Claude에 서버가 표시되지 않는 경우
claude_desktop_config.json파일의 구문을 확인합니다.- 프로젝트 경로가 상대 경로가 아닌 절대 경로인지 확인합니다.
- Claude Desktop을 완전히 다시 시작합니다.
도구 호출이 아무 메시지 없이 실패하는 경우
Claude가 도구를 사용하려고 하지만 실패하는 경우 다음을 확인하세요.
- Claude 로그에서 오류를 확인합니다.
- 서버가 오류 없이 빌드되고 실행되는지 확인합니다.
- Claude Desktop을 다시 시작해 봅니다.
어떤 방법으로도 해결되지 않으면 어떻게 해야 하나요?
더 나은 디버깅 도구와 자세한 안내는 디버깅 가이드를 참조하세요.
Weather API 문제
오류: 그리드 지점 데이터를 가져오지 못했습니다
일반적으로 다음 중 하나가 원인입니다.
- 좌표가 미국 밖에 있습니다.
- NWS API에 문제가 발생했습니다.
- 요청 속도 제한이 적용되었습니다.
해결 방법:
- 미국 내 좌표를 사용하고 있는지 확인합니다.
- 요청 사이에 짧은 지연 시간을 추가합니다.
- NWS API 상태 페이지를 확인합니다.
오류: [STATE]에 현재 발효 중인 특보가 없습니다
이는 오류가 아닙니다. 해당 주에 현재 발효 중인 기상 특보가 없다는 의미입니다. 다른 주를 시도하거나 악천후가 발생했을 때 다시 확인하세요.