MCP 클라이언트 구축
이 튜토리얼에서는 MCP 서버에 연결되는 LLM 기반 챗봇 클라이언트를 구축하는 방법을 알아봅니다.
시작하기 전에 MCP 서버 구축 튜토리얼을 먼저 살펴보면 클라이언트와 서버가 통신하는 방식을 이해하는 데 도움이 됩니다.
이 튜토리얼의 전체 코드는 여기에서 확인할 수 있습니다.
시스템 요구 사항
시작하기 전에 시스템이 다음 요구 사항을 충족하는지 확인하세요.
- Mac 또는 Windows 컴퓨터
- 최신 버전의 Python 설치
- 최신 버전의
uv설치 - Python MCP SDK 2.0.0 이상 사용
환경 설정
먼저 uv로 새 Python 프로젝트를 만듭니다.
# Create project directory
uv init mcp-client
cd mcp-client

# Create virtual environment
uv venv

# Activate virtual environment
source .venv/bin/activate

# Install required packages
uv add mcp anthropic python-dotenv

# Remove boilerplate files
rm main.py

# Create our main file
touch client.py
# Create project directory
uv init mcp-client
cd mcp-client

# Create virtual environment
uv venv

# Activate virtual environment
.venv\Scripts\activate

# Install required packages
uv add mcp anthropic python-dotenv

# Remove boilerplate files
del main.py

# Create our main file
new-item client.py
API 키 설정
Anthropic Console에서 발급한 Anthropic API 키가 필요합니다.
키를 저장할 .env 파일을 만듭니다.
echo "ANTHROPIC_API_KEY=your-api-key-goes-here" > .env
.gitignore에 .env를 추가합니다.
echo ".env" >> .gitignore
클라이언트 생성
가져오기 및 기본 설정
먼저 필요한 항목을 가져오고 파일 전체에서 공유할 요소를 설정합니다.
import asyncio
import sys

from mcp import Client, StdioServerParameters
from mcp.client.stdio import stdio_client
from mcp_types import TextContent

from anthropic import Anthropic
from dotenv import load_dotenv

load_dotenv()  # load environment variables from .env

MODEL = "claude-opus-5"
anthropic = Anthropic()
Client는 프로그램이 서버와 통신할 때 사용하는 단일 객체입니다. 도구 목록 조회, 도구 호출, 리소스 읽기는 모두 이 객체의 메서드로 제공됩니다.
서버 연결 관리
다음으로 주어진 서버 스크립트에 따라 실행할 프로세스를 결정합니다.
def server_params(server_script_path: str) -> StdioServerParameters:
    """Describe the subprocess that runs an MCP server

    Args:
        server_script_path: Path to the server script (.py or .js)
    """
    if server_script_path.endswith(".py"):
        command = "python"
    elif server_script_path.endswith(".js"):
        command = "node"
    else:
        raise ValueError("Server script must be a .py or .js file")

    return StdioServerParameters(command=command, args=[server_script_path])
StdioServerParameters는 연결 자체가 아니라 연결 설정입니다. stdio_client()가 이 설정을 stdio 전송 방식으로 변환하고, Client의 async with 블록에 진입하면 해당 전송 연결이 열립니다. 이 두 작업은 main()에서 처리합니다.
쿼리 처리 로직
이제 쿼리를 처리하고 도구 호출을 다루는 핵심 기능을 추가합니다.
async def process_query(client: Client, query: str) -> str:
    """Process a query using Claude and available tools"""
    messages = [
        {
            "role": "user",
            "content": query
        }
    ]

    tool_list = await client.list_tools()
    available_tools = [{
        "name": tool.name,
        "description": tool.description,
        "input_schema": tool.input_schema
    } for tool in tool_list.tools]

    # Initial Claude API call
    response = anthropic.messages.create(
        model=MODEL,
        max_tokens=1000,
        messages=messages,
        tools=available_tools
    )

    # Process response and handle tool calls
    final_text = []
    tool_results = []

    for content in response.content:
        if content.type == 'text':
            final_text.append(content.text)
        elif content.type == 'tool_use':
            tool_name = content.name
            tool_args = content.input

            # Execute tool call
            result = await client.call_tool(tool_name, tool_args)
            final_text.append(f"[Calling tool {tool_name} with args {tool_args}]")

            tool_results.append({
                "type": "tool_result",
                "tool_use_id": content.id,
                "content": "\n".join(
                    block.text
                    for block in result.content
                    if isinstance(block, TextContent)
                ),
                "is_error": result.is_error
            })

    if tool_results:
        messages.append({"role": "assistant", "content": response.content})
        messages.append({"role": "user", "content": tool_results})

        # Get next response from Claude
        response = anthropic.messages.create(
            model=MODEL,
            max_tokens=1000,
            messages=messages,
            tools=available_tools
        )

        for content in response.content:
            if content.type == 'text':
                final_text.append(content.text)

    return "\n".join(final_text)
call_tool은 CallToolResult를 반환합니다. content는 블록 목록이므로 .text를 읽기 전에 TextContent로 범위를 좁힙니다. 도구 내부에서 예외가 발생해도 여기에서 예외를 다시 던지지는 않습니다. 대신 is_error가 설정된 응답을 반환하며, 이 플래그를 그대로 전달하면 Claude가 오류 메시지를 읽고 다른 방법을 시도할 수 있습니다.
대화형 채팅 인터페이스
이제 채팅 루프를 추가합니다.
async def chat_loop(client: Client) -> None:
    """Run an interactive chat loop"""
    print("\nMCP Client Started!")
    print("Type your queries or 'quit' to exit.")

    while True:
        try:
            query = (await asyncio.to_thread(input, "\nQuery: ")).strip()
        except EOFError:
            break

        if query.lower() == 'quit':
            break

        try:
            response = await process_query(client, query)
            print("\n" + response)
        except Exception as e:
            print(f"\nError: {e}")
input()은 블로킹 함수이므로 작업자 스레드에서 실행합니다. 그러면 사용자가 입력하는 동안 이벤트 루프가 연결을 계속 처리할 수 있습니다.
기본 진입점
마지막으로 기본 실행 로직을 추가합니다.
async def main() -> None:
    if len(sys.argv) < 2:
        print("Usage: python client.py <path_to_server_script>")
        sys.exit(1)

    async with Client(stdio_client(server_params(sys.argv[1]))) as client:
        tool_list = await client.list_tools()
        tool_names = [tool.name for tool in tool_list.tools]
        print("\nConnected to server with tools:", tool_names)

        await chat_loop(client)


if __name__ == "__main__":
    asyncio.run(main())
이 async with 블록이 전체 연결 수명 주기를 담당합니다. 블록에 진입하면 서버를 실행하고 서버와 사용할 프로토콜 버전을 합의하며, 블록을 벗어나면 연결을 끊고 하위 프로세스를 종료합니다. 직접 닫아야 할 항목은 없습니다.
전체 client.py 파일은 여기에서 확인할 수 있습니다.
주요 구성 요소 설명
1. 클라이언트 초기화
- 하나의
Client가 연결을 담당하며async with가 전체 수명 주기를 관리합니다. - 별도로 호출할 연결/종료 메서드 쌍이 없으며 이후 정리할 항목도 없습니다.
- Claude와 상호작용하도록 Anthropic 클라이언트를 구성합니다.
2. 서버 연결
- Python 및 Node.js 서버를 모두 지원합니다.
- 서버 스크립트 유형을 검증합니다.
- 서버를 하위 프로세스로 실행하고 stdio로 통신합니다.
- 연결이 열리면 사용 가능한 도구 목록을 조회합니다.
3. 쿼리 처리
- 대화 컨텍스트를 유지합니다.
- Claude의 응답과 도구 호출을 처리합니다.
- Claude와 도구 사이의 메시지 흐름을 관리합니다.
- 결과를 일관된 응답으로 결합합니다.
4. 대화형 인터페이스
- 간단한 명령줄 인터페이스를 제공합니다.
- 사용자 입력을 처리하고 응답을 표시합니다.
- 기본적인 오류 처리를 포함합니다.
- 정상적으로 종료할 수 있습니다.
5. 리소스 관리
async with블록을 벗어나면 연결을 끊고 서버 하위 프로세스를 종료합니다.- 쿼리가 실패해도 세션을 종료하지 않고 오류를 보고합니다.
quit를 입력하거나 표준 입력을 닫으면 정상적으로 종료됩니다.
자주 사용되는 사용자 지정 지점
-
도구 처리
- 특정 도구 유형을 처리하도록
process_query()를 수정합니다. - 도구 호출에 사용자 지정 오류 처리를 추가합니다.
- 도구별 응답 형식을 구현합니다.
- 특정 도구 유형을 처리하도록
-
응답 처리
- 도구 결과의 형식을 사용자 지정합니다.
- 응답 필터링 또는 변환을 추가합니다.
- 사용자 지정 로깅을 구현합니다.
-
사용자 인터페이스
- GUI 또는 웹 인터페이스를 추가합니다.
- 풍부한 콘솔 출력을 구현합니다.
- 명령 기록 또는 자동 완성을 추가합니다.
클라이언트 실행
원하는 MCP 서버와 함께 클라이언트를 실행하려면 다음 명령을 사용합니다.
uv run client.py path/to/server.py # python server
uv run client.py path/to/build/index.js # node server
클라이언트는 다음과 같이 작동합니다.
- 지정된 서버에 연결합니다.
- 사용 가능한 도구 목록을 조회합니다.
- 다음 작업을 수행할 수 있는 대화형 채팅 세션을 시작합니다.
- 쿼리 입력
- 도구 실행 확인
- Claude의 응답 수신
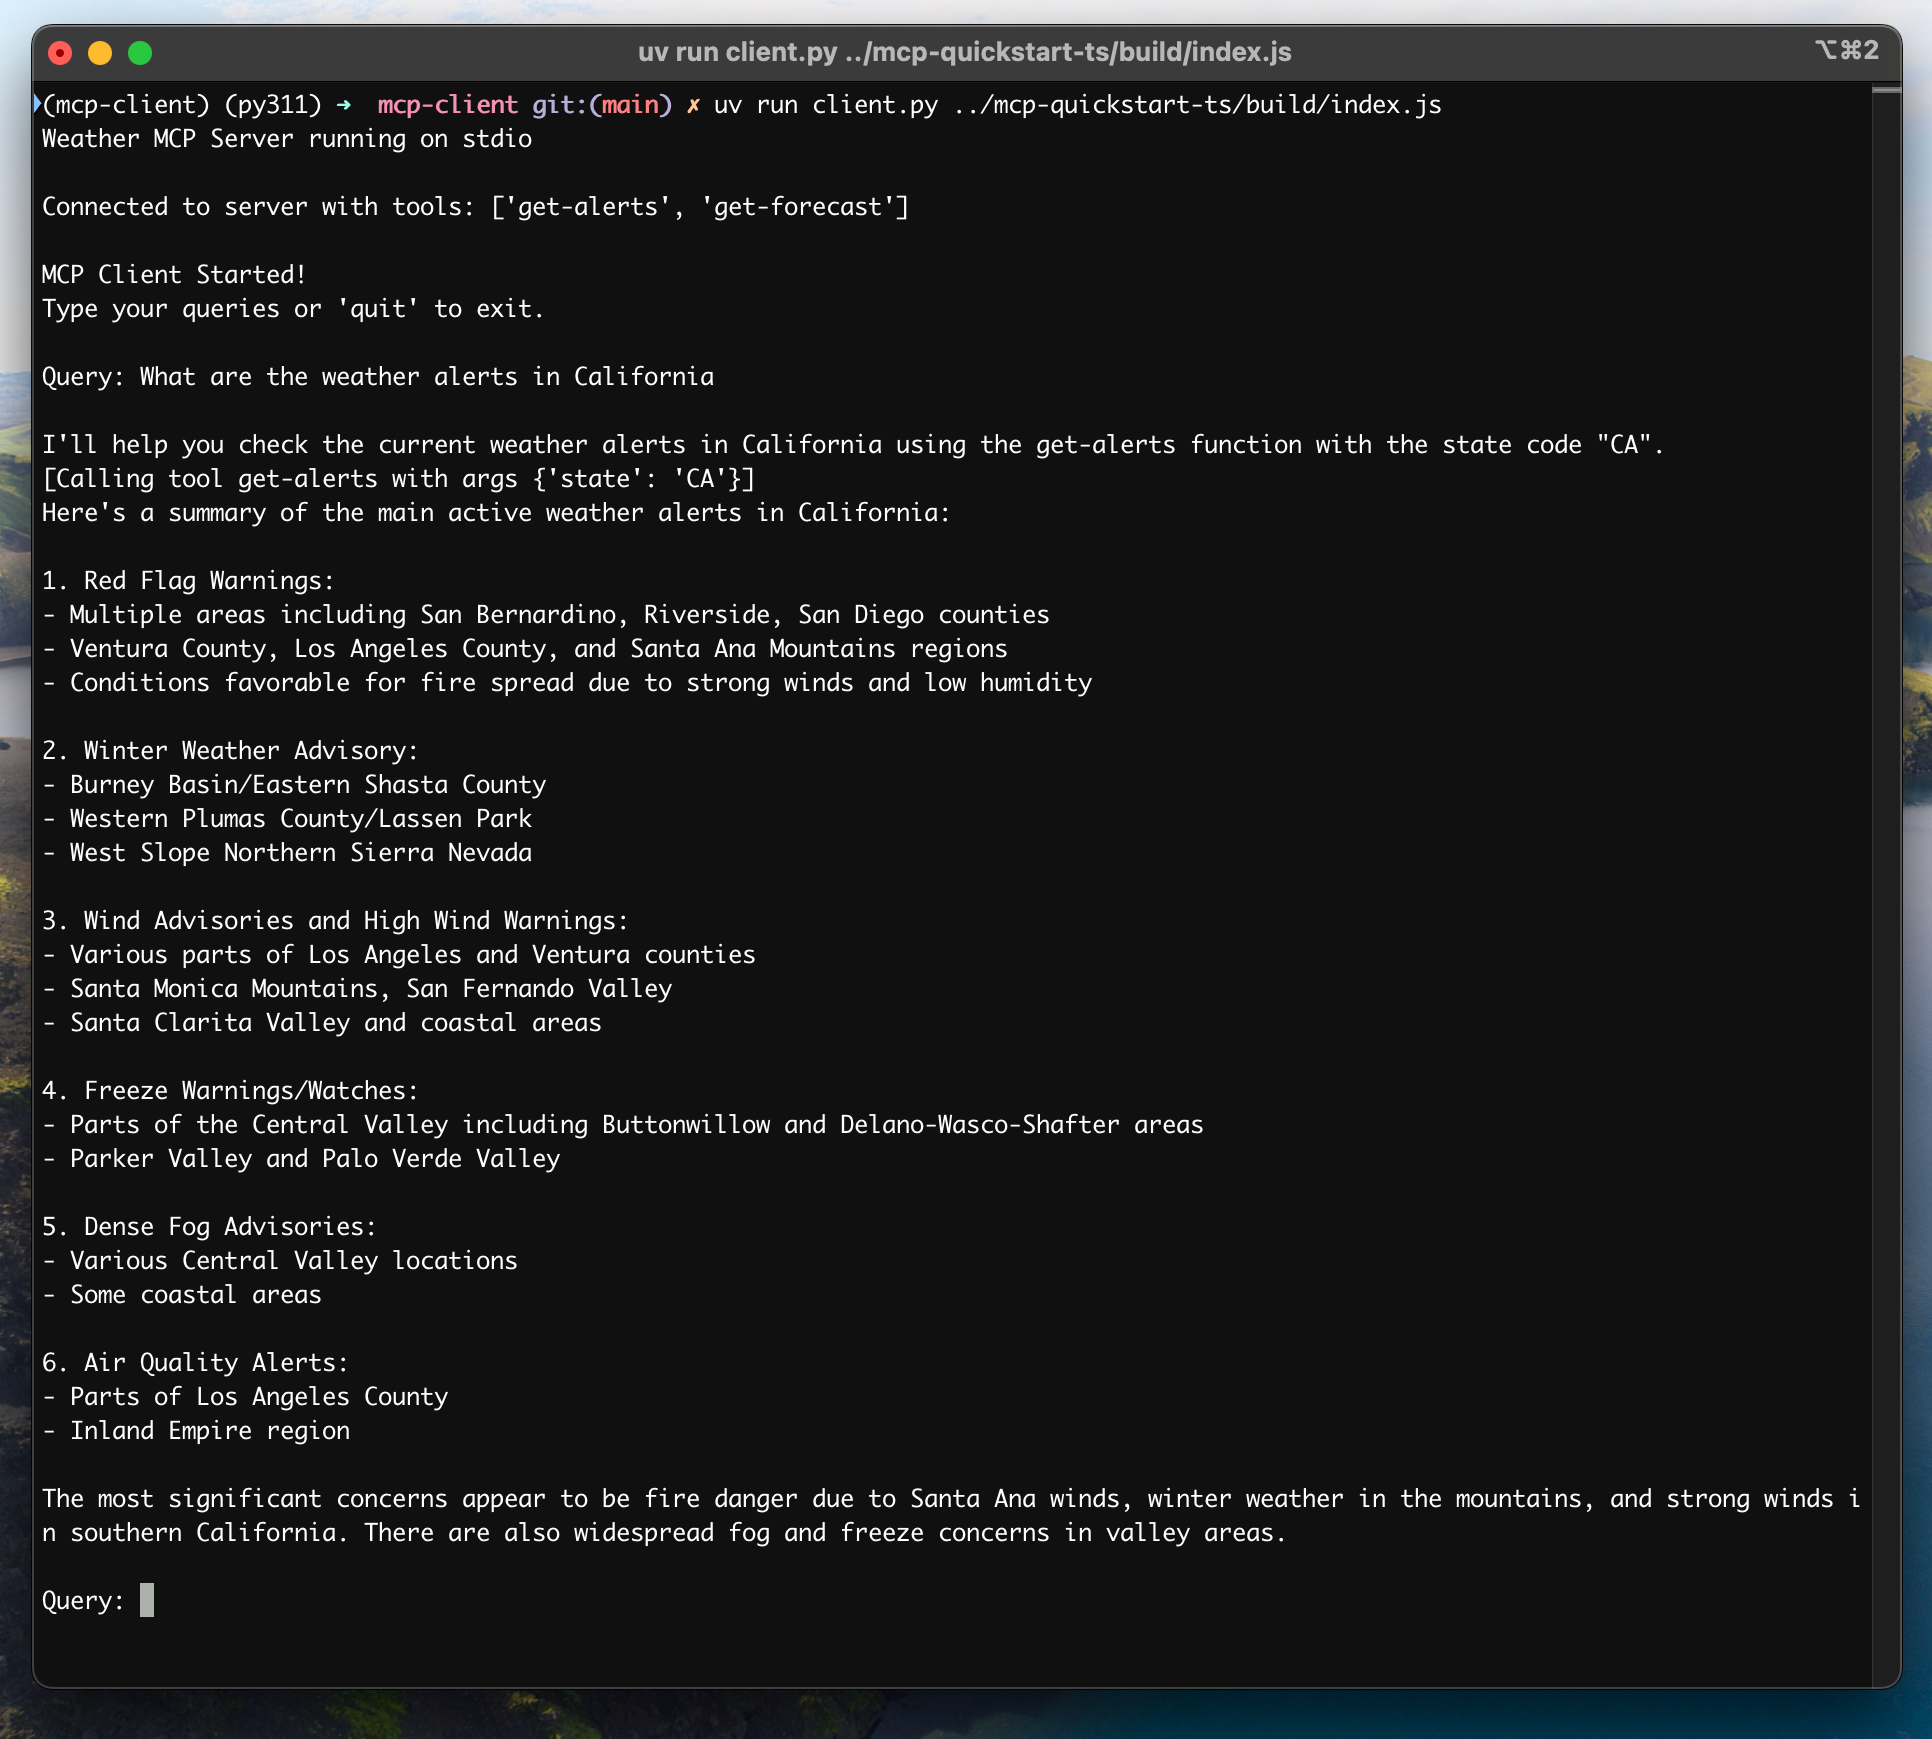
서버 빠른 시작의 날씨 서버에 연결했을 때 화면은 다음과 같습니다.
작동 방식
쿼리를 제출하면 다음 과정이 진행됩니다.
- 클라이언트가 서버에서 사용 가능한 도구 목록을 가져옵니다.
- 쿼리가 도구 설명과 함께 Claude로 전송됩니다.
- Claude가 사용할 도구가 있는지 판단하고 해당 도구를 선택합니다.
- 클라이언트가 요청된 도구 호출을 서버를 통해 실행합니다.
- 결과가 Claude로 다시 전송됩니다.
- Claude가 자연어 응답을 생성합니다.
- 사용자에게 응답이 표시됩니다.
모범 사례
-
오류 처리
- 실패한 도구가 예외를 던질 것으로 예상하지 말고
result.is_error를 확인합니다. - 의미 있는 오류 메시지를 제공합니다.
- 연결 문제를 안정적으로 처리합니다.
- 실패한 도구가 예외를 던질 것으로 예상하지 말고
-
리소스 관리
async with블록이 연결을 관리하도록 합니다.- 서버가 필요한 동안 연결을 열어 둡니다.
- 서버 연결 해제를 처리합니다.
-
보안
- API 키를
.env에 안전하게 저장합니다. - 서버 응답을 검증합니다.
- 도구 권한을 신중하게 설정합니다.
- API 키를
-
도구 이름
- 도구 이름은 여기에 명시된 형식에 따라 검증할 수 있습니다.
- 도구 이름이 명시된 형식을 따르면 MCP 클라이언트의 검증을 통과해야 합니다.
문제 해결
서버 경로 문제
- 서버 스크립트 경로가 올바른지 다시 확인합니다.
- 상대 경로가 작동하지 않으면 절대 경로를 사용합니다.
- Windows에서는 경로에 슬래시(/) 또는 이스케이프된 백슬래시(\)를 사용해야 합니다.
- 서버 파일의 확장자가 올바른지 확인합니다(Python은 .py, Node.js는 .js).
올바른 경로 사용 예시는 다음과 같습니다.
# Relative path
uv run client.py ./server/weather.py

# Absolute path
uv run client.py /Users/username/projects/mcp-server/weather.py

# Windows path (either format works)
uv run client.py C:/projects/mcp-server/weather.py
uv run client.py C:\\projects\\mcp-server\\weather.py
응답 시간
- 첫 응답에는 최대 30초가 걸릴 수 있습니다.
- 다음 작업이 진행되는 동안 발생하는 정상적인 현상입니다.
- 서버 초기화
- Claude의 쿼리 처리
- 도구 실행
- 이후 응답은 일반적으로 더 빠릅니다.
- 최초 대기 시간에는 프로세스를 중단하지 마세요.
일반적인 오류 메시지
다음 오류가 표시되는 경우:
FileNotFoundError: 서버 경로를 확인합니다.Connection refused: 서버가 실행 중이고 경로가 올바른지 확인합니다.Tool execution failed: 도구에 필요한 환경 변수가 설정되어 있는지 확인합니다.Timeout error:Client의read_timeout_seconds값을 늘리는 방안을 고려합니다.
이 튜토리얼의 전체 코드는 여기에서 확인할 수 있습니다.
시스템 요구 사항
시작하기 전에 시스템이 다음 요구 사항을 충족하는지 확인하세요.
- Mac 또는 Windows 컴퓨터
- Node.js 20 이상 설치
- 최신 버전의
npm설치 - Anthropic API 키(Claude)
환경 설정
먼저 프로젝트를 만들고 설정합니다.
# Create project directory
mkdir mcp-client-typescript
cd mcp-client-typescript

# Initialize npm project
npm init -y

# Install dependencies
npm install @anthropic-ai/sdk @modelcontextprotocol/client dotenv

# Install dev dependencies
npm install -D @types/node typescript

# Create source file
touch index.ts
# Create project directory
md mcp-client-typescript
cd mcp-client-typescript

# Initialize npm project
npm init -y

# Install dependencies
npm install @anthropic-ai/sdk @modelcontextprotocol/client dotenv

# Install dev dependencies
npm install -D @types/node typescript

# Create source file
new-item index.ts
package.json을 수정하여 type: "module"과 빌드 스크립트를 설정합니다.
{
  "type": "module",
  "scripts": {
    "build": "tsc && chmod 755 build/index.js"
  }
}
프로젝트 루트에 tsconfig.json을 만듭니다.
{
  "compilerOptions": {
    "target": "ES2022",
    "module": "Node16",
    "moduleResolution": "Node16",
    "types": ["node"],
    "outDir": "./build",
    "rootDir": "./",
    "strict": true,
    "esModuleInterop": true,
    "skipLibCheck": true,
    "forceConsistentCasingInFileNames": true
  },
  "include": ["index.ts"],
  "exclude": ["node_modules"]
}
API 키 설정
Anthropic Console에서 발급한 Anthropic API 키가 필요합니다.
키를 저장할 .env 파일을 만듭니다.
echo "ANTHROPIC_API_KEY=<your key here>" > .env
.gitignore에 .env를 추가합니다.
echo ".env" >> .gitignore
클라이언트 생성
기본 클라이언트 구조
먼저 필요한 항목을 가져오고 index.ts에 기본 클라이언트 클래스를 만듭니다.
import { Anthropic } from "@anthropic-ai/sdk";
import {
  MessageParam,
  Tool,
} from "@anthropic-ai/sdk/resources/messages/messages.mjs";
import { Client } from "@modelcontextprotocol/client";
import { StdioClientTransport } from "@modelcontextprotocol/client/stdio";
import readline from "readline/promises";
import dotenv from "dotenv";

dotenv.config();

const ANTHROPIC_API_KEY = process.env.ANTHROPIC_API_KEY;
if (!ANTHROPIC_API_KEY) {
  throw new Error("ANTHROPIC_API_KEY is not set");
}

class MCPClient {
  private mcp: Client;
  private anthropic: Anthropic;
  private transport: StdioClientTransport | null = null;
  private tools: Tool[] = [];

  constructor() {
    this.anthropic = new Anthropic({
      apiKey: ANTHROPIC_API_KEY,
    });
    this.mcp = new Client({ name: "mcp-client-cli", version: "1.0.0" });
  }
  // methods will go here
}
서버 연결 관리
다음으로 MCP 서버에 연결하는 메서드를 구현합니다.
async connectToServer(serverScriptPath: string) {
  try {
    const isJs = serverScriptPath.endsWith(".js");
    const isPy = serverScriptPath.endsWith(".py");
    if (!isJs && !isPy) {
      throw new Error("Server script must be a .js or .py file");
    }
    const command = isPy
      ? process.platform === "win32"
        ? "python"
        : "python3"
      : process.execPath;

    this.transport = new StdioClientTransport({
      command,
      args: [serverScriptPath],
    });
    await this.mcp.connect(this.transport);

    const toolsResult = await this.mcp.listTools();
    this.tools = toolsResult.tools.map((tool) => {
      return {
        name: tool.name,
        description: tool.description,
        input_schema: tool.inputSchema,
      };
    });
    console.log(
      "Connected to server with tools:",
      this.tools.map(({ name }) => name)
    );
  } catch (e) {
    console.log("Failed to connect to MCP server: ", e);
    throw e;
  }
}
쿼리 처리 로직
이제 쿼리를 처리하고 도구 호출을 다루는 핵심 기능을 추가합니다.
async processQuery(query: string) {
  const messages: MessageParam[] = [
    {
      role: "user",
      content: query,
    },
  ];

  const response = await this.anthropic.messages.create({
    model: "claude-opus-5",
    max_tokens: 1000,
    messages,
    tools: this.tools,
  });

  const finalText = [];

  for (const content of response.content) {
    if (content.type === "text") {
      finalText.push(content.text);
    } else if (content.type === "tool_use") {
      const toolName = content.name;
      const toolArgs = content.input as { [x: string]: unknown } | undefined;

      const result = await this.mcp.callTool({
        name: toolName,
        arguments: toolArgs,
      });
      finalText.push(
        `[Calling tool ${toolName} with args ${JSON.stringify(toolArgs)}]`
      );

      messages.push({
        role: "user",
        content: result.content
          .filter((block) => block.type === "text")
          .map((block) => block.text)
          .join("\n"),
      });

      const response = await this.anthropic.messages.create({
        model: "claude-opus-5",
        max_tokens: 1000,
        messages,
      });

      finalText.push(
        response.content[0].type === "text" ? response.content[0].text : ""
      );
    }
  }

  return finalText.join("\n");
}
대화형 채팅 인터페이스
이제 채팅 루프와 정리 기능을 추가합니다.
async chatLoop() {
  const rl = readline.createInterface({
    input: process.stdin,
    output: process.stdout,
  });

  try {
    console.log("\nMCP Client Started!");
    console.log("Type your queries or 'quit' to exit.");

    while (true) {
      const message = await rl.question("\nQuery: ");
      if (message.toLowerCase() === "quit") {
        break;
      }
      const response = await this.processQuery(message);
      console.log("\n" + response);
    }
  } finally {
    rl.close();
  }
}

async cleanup() {
  await this.mcp.close();
}
기본 진입점
마지막으로 기본 실행 로직을 추가합니다.
async function main() {
  if (process.argv.length < 3) {
    console.log("Usage: node index.ts <path_to_server_script>");
    return;
  }
  const mcpClient = new MCPClient();
  try {
    await mcpClient.connectToServer(process.argv[2]);
    await mcpClient.chatLoop();
  } catch (e) {
    console.error("Error:", e);
    await mcpClient.cleanup();
    process.exit(1);
  } finally {
    await mcpClient.cleanup();
    process.exit(0);
  }
}

main();
클라이언트 실행
원하는 MCP 서버와 함께 클라이언트를 실행하려면 다음 명령을 사용합니다.
# Build TypeScript
npm run build

# Run the client
node build/index.js path/to/server.py # python server
node build/index.js path/to/build/index.js # node server
클라이언트는 다음과 같이 작동합니다.
- 지정된 서버에 연결합니다.
- 사용 가능한 도구 목록을 조회합니다.
- 다음 작업을 수행할 수 있는 대화형 채팅 세션을 시작합니다.
- 쿼리 입력
- 도구 실행 확인
- Claude의 응답 수신
작동 방식
쿼리를 제출하면 다음 과정이 진행됩니다.
- 클라이언트가 서버에서 사용 가능한 도구 목록을 가져옵니다.
- 쿼리가 도구 설명과 함께 Claude로 전송됩니다.
- Claude가 사용할 도구가 있는지 판단하고 해당 도구를 선택합니다.
- 클라이언트가 요청된 도구 호출을 서버를 통해 실행합니다.
- 결과가 Claude로 다시 전송됩니다.
- Claude가 자연어 응답을 생성합니다.
- 사용자에게 응답이 표시됩니다.
모범 사례
-
오류 처리
- TypeScript의 타입 시스템을 활용하여 오류를 더 잘 감지합니다.
- 도구 호출을 try-catch 블록으로 감쌉니다.
- 의미 있는 오류 메시지를 제공합니다.
- 연결 문제를 안정적으로 처리합니다.
-
보안
- API 키를
.env에 안전하게 저장합니다. - 서버 응답을 검증합니다.
- 도구 권한을 신중하게 설정합니다.
- API 키를
문제 해결
서버 경로 문제
- 서버 스크립트 경로가 올바른지 다시 확인합니다.
- 상대 경로가 작동하지 않으면 절대 경로를 사용합니다.
- Windows에서는 경로에 슬래시(/) 또는 이스케이프된 백슬래시(\)를 사용해야 합니다.
- 서버 파일의 확장자가 올바른지 확인합니다(Node.js는 .js, Python은 .py).
올바른 경로 사용 예시는 다음과 같습니다.
# Relative path
node build/index.js ./server/build/index.js

# Absolute path
node build/index.js /Users/username/projects/mcp-server/build/index.js

# Windows path (either format works)
node build/index.js C:/projects/mcp-server/build/index.js
node build/index.js C:\\projects\\mcp-server\\build\\index.js
응답 시간
- 첫 응답에는 최대 30초가 걸릴 수 있습니다.
- 다음 작업이 진행되는 동안 발생하는 정상적인 현상입니다.
- 서버 초기화
- Claude의 쿼리 처리
- 도구 실행
- 이후 응답은 일반적으로 더 빠릅니다.
- 최초 대기 시간에는 프로세스를 중단하지 마세요.
일반적인 오류 메시지
다음 오류가 표시되는 경우:
Error: Cannot find module: 빌드 폴더를 확인하고 TypeScript 컴파일이 성공했는지 확인합니다.Connection refused: 서버가 실행 중이고 경로가 올바른지 확인합니다.Tool execution failed: 도구에 필요한 환경 변수가 설정되어 있는지 확인합니다.ANTHROPIC_API_KEY is not set: .env 파일과 환경 변수를 확인합니다.TypeError: 도구 인수에 올바른 타입을 사용했는지 확인합니다.BadRequestError: Anthropic API에 접근할 수 있는 크레딧이 충분한지 확인합니다.
이 예제에서는 Spring AI의 Model Context Protocol(MCP)과 Brave Search MCP 서버를 결합한 대화형 챗봇을 구축하는 방법을 보여줍니다. 이 애플리케이션은 Anthropic의 Claude AI 모델을 기반으로 하는 대화형 인터페이스를 만들고 Brave Search를 통해 인터넷을 검색하여 실시간 웹 데이터와 자연어로 상호작용할 수 있게 합니다. 이 튜토리얼의 전체 코드는 여기에서 확인할 수 있습니다.
시스템 요구 사항
시작하기 전에 시스템이 다음 요구 사항을 충족하는지 확인하세요.
- Java 17 이상
- Maven 3.6+
- npx 패키지 관리자
- Anthropic API 키(Claude)
- Brave Search API 키
환경 설정
-
npx(Node Package eXecute)를 설치합니다. 먼저 npm을 설치한 다음 아래 명령을 실행합니다.
npm install -g npx -
저장소를 복제합니다.
git clone https://github.com/spring-projects/spring-ai-examples.git
cd model-context-protocol/web-search/brave-chatbot -
API 키를 설정합니다.
export ANTHROPIC_API_KEY='your-anthropic-api-key-here'
export BRAVE_API_KEY='your-brave-api-key-here' -
애플리케이션을 빌드합니다.
./mvnw clean install -
Maven으로 애플리케이션을 실행합니다.
./mvnw spring-boot:run
작동 방식
애플리케이션은 여러 구성 요소를 통해 Spring AI와 Brave Search MCP 서버를 통합합니다.
MCP 클라이언트 구성
- pom.xml에 필요한 종속성:
<dependency>
    <groupId>org.springframework.ai</groupId>
    <artifactId>spring-ai-starter-mcp-client</artifactId>
</dependency>
<dependency>
    <groupId>org.springframework.ai</groupId>
    <artifactId>spring-ai-starter-model-anthropic</artifactId>
</dependency>
- 애플리케이션 속성(application.yml):
spring:
  ai:
    mcp:
      client:
        enabled: true
        name: brave-search-client
        version: 1.0.0
        type: SYNC
        request-timeout: 20s
        stdio:
          root-change-notification: true
          servers-configuration: classpath:/mcp-servers-config.json
        toolcallback:
          enabled: true
    anthropic:
      api-key: ${ANTHROPIC_API_KEY}
이 설정은 spring-ai-starter-mcp-client를 활성화하여 제공된 서버 구성에 따라 하나 이상의 McpClient를 생성합니다.
spring.ai.mcp.client.toolcallback.enabled=true 속성은 모든 MCP 도구를 Spring AI 도구로 자동 등록하는 도구 콜백 메커니즘을 활성화합니다.
이 기능은 기본적으로 비활성화되어 있습니다.
- MCP 서버 구성(
mcp-servers-config.json):
{
  "mcpServers": {
    "brave-search": {
      "command": "npx",
      "args": ["-y", "@modelcontextprotocol/server-brave-search"],
      "env": {
        "BRAVE_API_KEY": "<PUT YOUR BRAVE API KEY>"
      }
    }
  }
}
채팅 구현
챗봇은 MCP 도구를 통합한 Spring AI의 ChatClient를 사용해 구현합니다.
var chatClient = chatClientBuilder
    .defaultSystem("You are useful assistant, expert in AI and Java.")
    .defaultToolCallbacks((Object[]) mcpToolAdapter.toolCallbacks())
    .defaultAdvisors(new MessageChatMemoryAdvisor(new InMemoryChatMemory()))
    .build();
주요 기능:
- 자연어 이해에 Claude AI 모델을 사용합니다.
- MCP를 통해 Brave Search를 통합하여 실시간 웹 검색 기능을 제공합니다.
- InMemoryChatMemory를 사용하여 대화 메모리를 유지합니다.
- 대화형 명령줄 애플리케이션으로 실행됩니다.
빌드 및 실행
./mvnw clean install
java -jar ./target/ai-mcp-brave-chatbot-0.0.1-SNAPSHOT.jar
또는
./mvnw spring-boot:run
애플리케이션이 질문을 입력할 수 있는 대화형 채팅 세션을 시작합니다. 챗봇은 쿼리에 답하기 위해 인터넷 정보가 필요할 때 Brave Search를 사용합니다.
챗봇은 다음 작업을 수행할 수 있습니다.
- 내장 지식을 활용하여 질문에 답합니다.
- 필요할 때 Brave Search로 웹을 검색합니다.
- 대화에서 이전 메시지의 컨텍스트를 기억합니다.
- 여러 출처의 정보를 결합하여 종합적인 답변을 제공합니다.
고급 구성
MCP 클라이언트는 다음과 같은 추가 구성 옵션을 지원합니다.
McpClientCustomizer<McpClient.SyncSpec>또는McpClientCustomizer<McpClient.AsyncSpec>빈을 통한 클라이언트 사용자 지정STDIO및 Streamable HTTP 등 여러 전송 유형을 사용하는 다중 클라이언트- Spring AI 도구 실행 프레임워크와의 통합
- 자동 클라이언트 초기화 및 수명 주기 관리
Streamable HTTP를 통해 원격 MCP 서버에 연결하려면 연결 URL을 구성합니다.
spring.ai.mcp.client.streamable-http.connections.server1.url=http://localhost:8080
WebFlux 기반 애플리케이션에서는 WebFlux 스타터를 대신 사용할 수 있습니다.
<dependency>
    <groupId>org.springframework.ai</groupId>
    <artifactId>spring-ai-starter-mcp-client-webflux</artifactId>
</dependency>
이 스타터는 유사한 기능을 제공하지만 WebFlux 기반 Streamable HTTP 전송 구현을 사용하므로 프로덕션 배포에 권장됩니다.
이 튜토리얼의 전체 코드는 여기에서 확인할 수 있습니다.
시스템 요구 사항
시작하기 전에 시스템이 다음 요구 사항을 충족하는지 확인하세요.
- JDK 11 이상
- Anthropic API 키(Claude)
환경 설정
아직 설치하지 않았다면 먼저 java와 gradle을 설치합니다.
java는 Oracle JDK 공식 웹사이트에서 다운로드할 수 있습니다.
java 설치를 확인합니다.
java --version
이제 프로젝트를 만들고 설정합니다.
# Create a new directory for our project
mkdir kotlin-mcp-client
cd kotlin-mcp-client

# Initialize a new kotlin project
gradle init
# Create a new directory for our project
md kotlin-mcp-client
cd kotlin-mcp-client
# Initialize a new kotlin project
gradle init
gradle init을 실행한 뒤 프로젝트 유형으로 Application을, 프로그래밍 언어로 Kotlin을 선택합니다.
또는 IntelliJ IDEA 프로젝트 마법사를 사용하여 Kotlin 애플리케이션을 만들 수 있습니다.
프로젝트를 만든 후 build.gradle.kts의 내용을 다음과 같이 바꿉니다.
// Check latest versions at https://github.com/modelcontextprotocol/kotlin-sdk/releases
val mcpVersion = "0.9.0"
val ktorVersion = "3.2.3"
val anthropicVersion = "2.15.0"
val slf4jVersion = "2.0.17"

plugins {
    kotlin("jvm") version "2.3.20"
    id("com.gradleup.shadow") version "8.3.9"
    application
}

application {
    mainClass.set("MainKt")
}

dependencies {
    implementation("io.modelcontextprotocol:kotlin-sdk:$mcpVersion")
    implementation("io.ktor:ktor-client-cio:$ktorVersion")
    implementation("com.anthropic:anthropic-java:$anthropicVersion")
    implementation("org.slf4j:slf4j-simple:$slf4jVersion")
}
모든 항목이 올바르게 설정되었는지 확인합니다.
./gradlew build
API 키 설정
Anthropic Console에서 발급한 Anthropic API 키가 필요합니다.
API 키를 설정합니다.
export ANTHROPIC_API_KEY='your-anthropic-api-key-here'
클라이언트 생성
기본 클라이언트 구조
먼저 기본 클라이언트 클래스를 만듭니다.
class MCPClient(apiKey: String) : AutoCloseable {
    private val anthropic = AnthropicOkHttpClient.builder()
        .apiKey(apiKey)
        .build()

  private val mcp: Client = Client(
        clientInfo = Implementation(name = "mcp-client-cli", version = "1.0.0")
  )
    private var serverProcess: Process? = null
    private lateinit var tools: List<ToolUnion>

    // methods will go here

    override fun close() {
        runBlocking {
            mcp.close()
        }
        serverProcess?.destroy()
        anthropic.close()
    }
}
서버 연결 관리
다음으로 MCP 서버에 연결하는 메서드를 구현합니다.
suspend fun connectToServer(serverScriptPath: String) {
    val command = buildList {
        when (serverScriptPath.substringAfterLast(".")) {
            "js" -> add("node")
            "py" -> add(if (System.getProperty("os.name").lowercase().contains("win")) "python" else "python3")
            "jar" -> addAll(listOf("java", "-jar"))
            else -> throw IllegalArgumentException("Server script must be a .js, .py or .jar file")
        }
        add(serverScriptPath)
    }

    val process = ProcessBuilder(command).start()
    serverProcess = process

    val transport = StdioClientTransport(
        input = process.inputStream.asSource().buffered(),
        output = process.outputStream.asSink().buffered(),
    )

    mcp.connect(transport)

    val toolsResult = mcp.listTools()
    tools = toolsResult.tools.map { tool ->
        ToolUnion.ofTool(
            Tool.builder()
                .name(tool.name)
                .description(tool.description ?: "")
                .inputSchema(
                    Tool.InputSchema.builder()
                        .type(JsonValue.from(tool.inputSchema.type))
                        .properties(tool.inputSchema.properties?.toJsonValue() ?: EmptyJsonObject.toJsonValue())
                        .putAdditionalProperty("required", JsonValue.from(tool.inputSchema.required))
                        .build(),
                )
                .build(),
        )
    }
    println("Connected to server with tools: ${tools.joinToString(", ") { it.tool().get().name() }}")
}
JsonObject.toJsonValue() 도우미
이 도우미는 Jackson을 사용하여 kotlinx.serialization의 JsonObject를 Anthropic SDK의 JsonValue로 변환합니다.
private fun JsonObject.toJsonValue(): JsonValue {
    val mapper = ObjectMapper()
    val node = mapper.readTree(this.toString())
    return JsonValue.fromJsonNode(node)
}
쿼리 처리 로직
이제 쿼리를 처리하고 도구 호출을 다루는 핵심 기능을 추가합니다.
suspend fun processQuery(query: String): String {
    val messages = mutableListOf(
        MessageParam.builder()
            .role(MessageParam.Role.USER)
            .content(query)
            .build(),
    )

    val response = anthropic.messages().create(
        MessageCreateParams.builder()
            .model("claude-opus-5")
            .maxTokens(1024)
            .messages(messages)
            .tools(tools)
            .build(),
    )

    val finalText = mutableListOf<String>()
    response.content().forEach { content ->
        when {
            content.isText() -> finalText.add(content.text().get().text())

            content.isToolUse() -> {
                val toolName = content.toolUse().get().name()
                val toolArgs =
                    content.toolUse().get()._input().convert(object : TypeReference<Map<String, JsonValue>>() {})

                val result = mcp.callTool(
                    name = toolName,
                    arguments = toolArgs ?: emptyMap(),
                )
                finalText.add("[Calling tool $toolName with args $toolArgs]")

                messages.add(
                    MessageParam.builder()
                        .role(MessageParam.Role.USER)
                        .content(
                            result.content
                                .filterIsInstance<TextContent>()
                                .joinToString("\n") { it.text }
                        )
                        .build(),
                )

                val aiResponse = anthropic.messages().create(
                    MessageCreateParams.builder()
                        .model("claude-opus-5")
                        .maxTokens(1024)
                        .messages(messages)
                        .build(),
                )

                finalText.add(aiResponse.content().first().text().get().text())
            }
        }
    }

    return finalText.joinToString("\n")
}
대화형 채팅
채팅 루프를 추가합니다.
suspend fun chatLoop() {
    println("\nMCP Client Started!")
    println("Type your queries or 'quit' to exit.")

    while (true) {
        print("\nQuery: ")
        val message = readlnOrNull() ?: break
        if (message.trim().lowercase() == "quit") break

        try {
            val response = processQuery(message)
            println("\n$response")
        } catch (e: Exception) {
            println("\nError: ${e.message}")
        }
    }
}
기본 진입점
마지막으로 기본 실행 함수를 추가합니다.
fun main(args: Array<String>) = runBlocking {
    require(args.isNotEmpty()) { "Usage: java -jar <path> <path_to_server_script>" }

    val apiKey = System.getenv("ANTHROPIC_API_KEY")
    require(!apiKey.isNullOrBlank()) { "ANTHROPIC_API_KEY environment variable is not set" }

    val client = MCPClient(apiKey)
    client.use {
        client.connectToServer(args.first())
        client.chatLoop()
    }
}
클라이언트 실행
원하는 MCP 서버와 함께 클라이언트를 실행하려면 다음 명령을 사용합니다.
./gradlew build

# Run the client
java -jar build/libs/kotlin-mcp-client-0.1.0-all.jar path/to/server.jar # JVM server
java -jar build/libs/kotlin-mcp-client-0.1.0-all.jar path/to/server.py  # Python server
java -jar build/libs/kotlin-mcp-client-0.1.0-all.jar path/to/build/index.js # Node server
또는 Gradle로 직접 실행할 수 있습니다.
./gradlew run --args="path/to/server.jar"
클라이언트는 다음과 같이 작동합니다.
- 지정된 서버에 연결합니다.
- 사용 가능한 도구 목록을 조회합니다.
- 다음 작업을 수행할 수 있는 대화형 채팅 세션을 시작합니다.
- 쿼리 입력
- 도구 실행 확인
- Claude의 응답 수신
작동 방식
상위 수준의 워크플로우 스키마는 다음과 같습니다.
---
config:
    theme: neutral
---
sequenceDiagram
    actor User
    participant Client
    participant Claude
    participant MCP_Server as MCP Server
    participant Tools

    User->>Client: Send query
    Client<<->>MCP_Server: Get available tools
    Client->>Claude: Send query with tool descriptions
    Claude-->>Client: Decide tool execution
    Client->>MCP_Server: Request tool execution
    MCP_Server->>Tools: Execute chosen tools
    Tools-->>MCP_Server: Return results
    MCP_Server-->>Client: Send results
    Client->>Claude: Send tool results
    Claude-->>Client: Provide final response
    Client-->>User: Display response
쿼리를 제출하면 다음 과정이 진행됩니다.
- 클라이언트가 서버에서 사용 가능한 도구 목록을 가져옵니다.
- 쿼리가 도구 설명과 함께 Claude로 전송됩니다.
- Claude가 사용할 도구가 있는지 판단하고 해당 도구를 선택합니다.
- 클라이언트가 요청된 도구 호출을 서버를 통해 실행합니다.
- 결과가 Claude로 다시 전송됩니다.
- Claude가 자연어 응답을 생성합니다.
- 사용자에게 응답이 표시됩니다.
모범 사례
-
오류 처리
- Kotlin의 타입 시스템을 활용하여 오류를 명시적으로 모델링합니다.
- 예외가 발생할 수 있는 외부 도구 및 API 호출을
try-catch블록으로 감쌉니다. - 명확하고 의미 있는 오류 메시지를 제공합니다.
- 네트워크 시간 초과와 연결 문제를 안정적으로 처리합니다.
-
보안
- API 키와 보안 정보를
local.properties, 환경 변수 또는 보안 정보 관리자에 안전하게 저장합니다. - 예기치 않거나 안전하지 않은 데이터 사용을 피하도록 모든 외부 응답을 검증합니다.
- 도구를 사용할 때 권한과 신뢰 경계를 신중하게 설정합니다.
- API 키와 보안 정보를
-
환경
ANTHROPIC_API_KEY를 하드코딩하지 말고 환경 변수로 설정합니다.- 로컬 개발에서는 적절한
.gitignore규칙과 함께.env파일을 사용합니다.
문제 해결
서버 경로 문제
- 서버 스크립트 경로가 올바른지 다시 확인합니다.
- 상대 경로가 작동하지 않으면 절대 경로를 사용합니다.
- Windows에서는 경로에 슬래시(/) 또는 이스케이프된 백슬래시(\)를 사용해야 합니다.
- 필요한 런타임이 설치되어 있는지 확인합니다(Java는 java, Node.js는 npm, Python은 uv).
- 서버 파일의 확장자가 올바른지 확인합니다(Java는 .jar, Node.js는 .js, Python은 .py).
올바른 경로 사용 예시는 다음과 같습니다.
# Relative path
java -jar build/libs/client.jar ./server/build/libs/server.jar

# Absolute path
java -jar build/libs/client.jar /Users/username/projects/mcp-server/build/libs/server.jar

# Windows path (either format works)
java -jar build/libs/client.jar C:/projects/mcp-server/build/libs/server.jar
java -jar build/libs/client.jar C:\\projects\\mcp-server\\build\\libs\\server.jar
빌드 문제
- 모든 종속성을 포함하는 섀도 JAR을 만들려면
./gradlew jar가 아닌./gradlew build또는./gradlew shadowJar를 사용합니다. - JDK 버전 오류가 발생하면 설치된 JDK 버전이
build.gradle.kts의jvmToolchain설정과 같거나 높은지 확인합니다.
응답 시간
- 첫 응답에는 최대 30초가 걸릴 수 있습니다.
- 다음 작업이 진행되는 동안 발생하는 정상적인 현상입니다.
- 서버 초기화
- Claude의 쿼리 처리
- 도구 실행
- 이후 응답은 일반적으로 더 빠릅니다.
- 최초 대기 시간에는 프로세스를 중단하지 마세요.
일반적인 오류 메시지
다음 오류가 표시되는 경우:
Connection refused: 서버가 실행 중이고 경로가 올바른지 확인합니다.Tool execution failed: 도구에 필요한 환경 변수가 설정되어 있는지 확인합니다.ANTHROPIC_API_KEY is not set: 환경 변수를 확인합니다.
이 튜토리얼의 전체 코드는 여기에서 확인할 수 있습니다.
시스템 요구 사항
시작하기 전에 시스템이 다음 요구 사항을 충족하는지 확인하세요.
- .NET 8.0 이상
- Anthropic API 키(Claude)
- Windows, Linux 또는 macOS
환경 설정
먼저 새 .NET 프로젝트를 만듭니다.
dotnet new console -n QuickstartClient
cd QuickstartClient
그런 다음 프로젝트에 필요한 종속성을 추가합니다.
dotnet add package ModelContextProtocol --prerelease
dotnet add package Anthropic.SDK
dotnet add package Microsoft.Extensions.Hosting
dotnet add package Microsoft.Extensions.AI
API 키 설정
Anthropic Console에서 발급한 Anthropic API 키가 필요합니다.
dotnet user-secrets init
dotnet user-secrets set "ANTHROPIC_API_KEY" "<your key here>"
클라이언트 생성
기본 클라이언트 구조
먼저 Program.cs 파일에 기본 클라이언트 클래스를 설정합니다.
using Anthropic.SDK;
using Microsoft.Extensions.AI;
using Microsoft.Extensions.Configuration;
using Microsoft.Extensions.Hosting;
using ModelContextProtocol.Client;
using ModelContextProtocol.Protocol.Transport;

var builder = Host.CreateApplicationBuilder(args);

builder.Configuration
    .AddEnvironmentVariables()
    .AddUserSecrets<Program>();
이 코드는 사용자 보안 정보에서 API 키를 읽을 수 있는 .NET 콘솔 애플리케이션의 기본 구조를 만듭니다.
다음으로 MCP 클라이언트를 설정합니다.
var (command, arguments) = GetCommandAndArguments(args);

var clientTransport = new StdioClientTransport(new()
{
    Name = "Demo Server",
    Command = command,
    Arguments = arguments,
});

await using var mcpClient = await McpClient.CreateAsync(clientTransport);

var tools = await mcpClient.ListToolsAsync();
foreach (var tool in tools)
{
    Console.WriteLine($"Connected to server with tools: {tool.Name}");
}
Program.cs 파일 끝에 다음 함수를 추가합니다.
static (string command, string[] arguments) GetCommandAndArguments(string[] args)
{
    return args switch
    {
        [var script] when script.EndsWith(".py") => ("python", args),
        [var script] when script.EndsWith(".js") => ("node", args),
        [var script] when Directory.Exists(script) || (File.Exists(script) && script.EndsWith(".csproj")) => ("dotnet", ["run", "--project", script, "--no-build"]),
        _ => throw new NotSupportedException("An unsupported server script was provided. Supported scripts are .py, .js, or .csproj")
    };
}
이 코드는 명령줄 인수로 전달된 서버에 연결할 MCP 클라이언트를 만듭니다. 그런 다음 연결된 서버에서 사용 가능한 도구 목록을 조회합니다.
쿼리 처리 로직
이제 쿼리를 처리하고 도구 호출을 다루는 핵심 기능을 추가합니다.
using var anthropicClient = new AnthropicClient(new APIAuthentication(builder.Configuration["ANTHROPIC_API_KEY"]))
    .Messages
    .AsBuilder()
    .UseFunctionInvocation()
    .Build();

var options = new ChatOptions
{
    MaxOutputTokens = 1000,
    ModelId = "claude-opus-5",
    Tools = [.. tools]
};

Console.ForegroundColor = ConsoleColor.Green;
Console.WriteLine("MCP Client Started!");
Console.ResetColor();

PromptForInput();
while(Console.ReadLine() is string query && !"exit".Equals(query, StringComparison.OrdinalIgnoreCase))
{
    if (string.IsNullOrWhiteSpace(query))
    {
        PromptForInput();
        continue;
    }

    await foreach (var message in anthropicClient.GetStreamingResponseAsync(query, options))
    {
        Console.Write(message);
    }
    Console.WriteLine();

    PromptForInput();
}

static void PromptForInput()
{
    Console.WriteLine("Enter a command (or 'exit' to quit):");
    Console.ForegroundColor = ConsoleColor.Cyan;
    Console.Write("> ");
    Console.ResetColor();
}
주요 구성 요소 설명
1. 클라이언트 초기화
- 클라이언트는
McpClient.CreateAsync()로 초기화하며, 이 메서드는 전송 유형과 서버 실행 명령을 설정합니다.
2. 서버 연결
- Python, Node.js 및 .NET 서버를 지원합니다.
- 인수에 지정된 명령으로 서버를 시작합니다.
- 서버와 통신할 때 stdio를 사용하도록 구성합니다.
- 세션과 사용 가능한 도구를 초기화합니다.
3. 쿼리 처리
- 채팅 클라이언트에 Microsoft.Extensions.AI를 활용합니다.
IChatClient가 자동 도구(함수) 호출을 사용하도록 구성합니다.- 클라이언트가 사용자 입력을 읽어 서버로 전송합니다.
- 서버가 쿼리를 처리하고 응답을 반환합니다.
- 사용자에게 응답이 표시됩니다.
클라이언트 실행
원하는 MCP 서버와 함께 클라이언트를 실행하려면 다음 명령을 사용합니다.
dotnet run -- path/to/server.csproj # dotnet server
dotnet run -- path/to/server.py # python server
dotnet run -- path/to/server.js # node server
클라이언트는 다음과 같이 작동합니다.
- 지정된 서버에 연결합니다.
- 사용 가능한 도구 목록을 조회합니다.
- 다음 작업을 수행할 수 있는 대화형 채팅 세션을 시작합니다.
- 쿼리 입력
- 도구 실행 확인
- Claude의 응답 수신
- 작업이 끝나면 세션을 종료합니다.
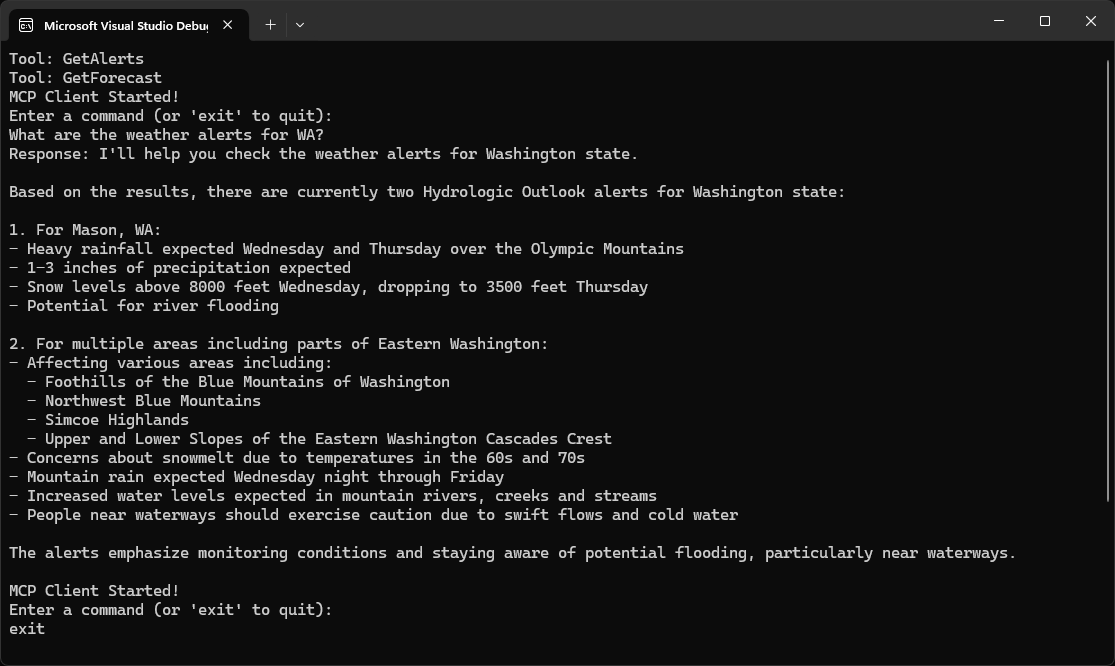
빠른 시작의 날씨 서버에 연결했을 때 화면은 다음과 같습니다.
이 튜토리얼의 전체 코드는 여기에서 확인할 수 있습니다.
시스템 요구 사항
시작하기 전에 시스템이 다음 요구 사항을 충족하는지 확인하세요.
- Mac 또는 Windows 컴퓨터
- Ruby 3.2.0 이상 설치(Anthropic SDK에 필요)
- Anthropic API 키(Claude)
환경 설정
먼저 새 Ruby 프로젝트를 만듭니다.
# Create project directory
mkdir mcp-client
cd mcp-client

# Create a Gemfile
bundle init

# Add required dependencies
bundle add anthropic base64 dotenv mcp

# Create our main file
touch client.rb
# Create project directory
mkdir mcp-client
cd mcp-client

# Create a Gemfile
bundle init

# Add required dependencies
bundle add anthropic base64 dotenv mcp

# Create our main file
new-item client.rb
API 키 설정
Anthropic Console에서 발급한 Anthropic API 키가 필요합니다.
키를 저장할 .env 파일을 만듭니다.
echo "ANTHROPIC_API_KEY=your-api-key-goes-here" > .env
.gitignore에 .env를 추가합니다.
echo ".env" >> .gitignore
클라이언트 생성
기본 클라이언트 구조
먼저 필요한 항목을 불러오고 기본 클라이언트 클래스를 만듭니다.
require "anthropic"
require "dotenv/load"
require "json"
require "mcp"

class MCPClient
  ANTHROPIC_MODEL = "claude-opus-5"

  def initialize
    @mcp_client = nil
    @transport = nil
    @anthropic_client = nil
  end

  # methods will go here
end
서버 연결 관리
다음으로 MCP 서버에 연결하는 메서드를 구현합니다.
def connect_to_server(server_script_path)
  command = case File.extname(server_script_path)
  when ".rb"
    "ruby"
  when ".py"
    "python3"
  when ".js"
    "node"
  else
    raise ArgumentError, "Server script must be a .rb, .py, or .js file."
  end

  @transport = MCP::Client::Stdio.new(command: command, args: [server_script_path])
  @mcp_client = MCP::Client.new(transport: @transport)
  @mcp_client.connect

  tool_names = @mcp_client.tools.map(&:name)
  puts "\nConnected to server with tools: #{tool_names}"
end
쿼리 처리 로직
이제 쿼리를 처리하고 도구 호출을 다루는 핵심 기능을 추가합니다.
private

def process_query(query)
  messages = [{ role: "user", content: query }]

  available_tools = @mcp_client.tools.map do |tool|
    { name: tool.name, description: tool.description, input_schema: tool.input_schema }
  end

  # Initial Claude API call.
  response = chat(messages, tools: available_tools)

  # Process response and handle tool calls.
  if response.content.any?(Anthropic::Models::ToolUseBlock)
    assistant_content = response.content.filter_map do |content_block|
      case content_block
      when Anthropic::Models::TextBlock
        { type: "text", text: content_block.text }
      when Anthropic::Models::ToolUseBlock
        { type: "tool_use", id: content_block.id, name: content_block.name, input: content_block.input }
      end
    end
    messages << { role: "assistant", content: assistant_content }
  end

  response.content.each_with_object([]) do |content, response_parts|
    case content
    when Anthropic::Models::TextBlock
      response_parts << content.text
    when Anthropic::Models::ToolUseBlock
      # Execute tool call via MCP.
      result = @mcp_client.call_tool(name: content.name, arguments: content.input)
      response_parts << "[Calling tool #{content.name} with args #{content.input.to_json}]"

      tool_result_content = result.dig("result", "content")
      result_text = if tool_result_content.is_a?(Array)
        tool_result_content.filter_map { |content_item| content_item["text"] }.join("\n")
      else
        tool_result_content.to_s
      end

      messages << {
        role: "user",
        content: [{
          type: "tool_result",
          tool_use_id: content.id,
          content: result_text
        }]
      }

      # Get next response from Claude.
      response = chat(messages)

      response.content.each do |content_block|
        response_parts << content_block.text if content_block.is_a?(Anthropic::Models::TextBlock)
      end
    end
  end.join("\n")
end

def chat(messages, tools: nil)
  params = { model: ANTHROPIC_MODEL, max_tokens: 1000, messages: messages }
  params[:tools] = tools if tools

  anthropic_client.messages.create(**params)
end

def anthropic_client
  @anthropic_client ||= Anthropic::Client.new(api_key: ENV["ANTHROPIC_API_KEY"])
end
대화형 채팅 인터페이스
이제 채팅 루프와 정리 기능을 추가합니다.
def chat_loop
  puts <<~MESSAGE
    MCP Client Started!
    Type your queries or 'quit' to exit.
  MESSAGE

  loop do
    print "\nQuery: "
    line = $stdin.gets
    break if line.nil?

    query = line.chomp.strip
    break if query.downcase == "quit"
    next if query.empty?

    begin
      response = process_query(query)
      puts "\n#{response}"
    rescue => e
      puts "\nError: #{e.message}"
    end
  end
end

def cleanup
  @transport&.close
end
기본 진입점
마지막으로 기본 실행 로직을 추가합니다.
if ARGV.empty?
  puts "Usage: ruby client.rb <path_to_server_script>"
  exit 1
end

client = MCPClient.new

begin
  client.connect_to_server(ARGV[0])

  api_key = ENV["ANTHROPIC_API_KEY"]
  if api_key.nil? || api_key.empty?
    puts <<~MESSAGE
      No ANTHROPIC_API_KEY found. To query these tools with Claude, set your API key:
        export ANTHROPIC_API_KEY=your-api-key-here
    MESSAGE
    exit
  end

  client.chat_loop
rescue => e
  puts "Error: #{e.message}"
  exit 1
ensure
  client.cleanup
end
전체 client.rb 파일은 여기에서 확인할 수 있습니다.
주요 구성 요소 설명
1. 클라이언트 초기화
MCPClient클래스는 지연 설정을 위해 참조를 nil로 초기화합니다.- Anthropic 클라이언트는
anthropic_client메서드를 통해 지연 초기화됩니다. dotenv를 사용하여.env에서 환경 변수를 불러옵니다.
2. 서버 연결
- Ruby, Python 및 Node.js 서버를 지원합니다.
File.extname으로 서버 스크립트 유형을 결정합니다.- stdio 전송에
MCP::Client::Stdio를 사용합니다. - MCP 클라이언트를 초기화하고 사용 가능한 도구 목록을 조회합니다.
3. 쿼리 처리
- MCP 도구를 Anthropic 도구 형식(
name,description,input_schema)에 매핑합니다. - 패턴 일치에
Anthropic::Models::TextBlock과Anthropic::Models::ToolUseBlock을 사용합니다. - 도구 호출을 순회하기 전에 어시스턴트 콘텐츠를 한 번 생성합니다.
@mcp_client.call_tool을 통해 도구 호출을 실행합니다.chat도우미 메서드로 Anthropic API 호출을 감쌉니다.result.dig("result", "content")로 도구 결과 콘텐츠를 추출합니다.- 최종 응답을 받기 위해 도구 결과를 Claude로 다시 전달합니다.
4. 대화형 인터페이스
- 간단한 명령줄 인터페이스를 제공합니다.
- 사용자 입력을 처리하고 응답을 표시합니다.
- 빈 쿼리는 건너뜁니다.
- 기본적인 오류 처리를 포함합니다.
5. 리소스 관리
begin...ensure를 통해 전송 연결을 올바르게 정리합니다.- 최상위
rescue에서 오류를 처리합니다. - 서버 연결 후 API 키를 검증합니다.
클라이언트 실행
원하는 MCP 서버와 함께 클라이언트를 실행하려면 다음 명령을 사용합니다.
bundle exec ruby client.rb path/to/server.rb # ruby server
bundle exec ruby client.rb path/to/server.py # python server
bundle exec ruby client.rb path/to/build/index.js # node server
클라이언트는 다음과 같이 작동합니다.
- 지정된 서버에 연결합니다.
- 사용 가능한 도구 목록을 조회합니다.
- 다음 작업을 수행할 수 있는 대화형 채팅 세션을 시작합니다.
- 쿼리 입력
- 도구 실행 확인
- Claude의 응답 수신
작동 방식
쿼리를 제출하면 다음 과정이 진행됩니다.
- 클라이언트가 서버에서 사용 가능한 도구 목록을 가져옵니다.
- 쿼리가 도구 설명과 함께 Claude로 전송됩니다.
- Claude가 사용할 도구가 있는지 판단하고 해당 도구를 선택합니다.
- 클라이언트가 요청된 도구 호출을 서버를 통해 실행합니다.
- 결과가 Claude로 다시 전송됩니다.
- Claude가 자연어 응답을 생성합니다.
- 사용자에게 응답이 표시됩니다.
모범 사례
-
오류 처리
- 도구 호출을
begin...rescue블록으로 감쌉니다. - 의미 있는 오류 메시지를 제공합니다.
- 연결 문제를 안정적으로 처리합니다.
- 도구 호출을
-
리소스 관리
- 작업이 끝나면 항상 전송 연결을 닫습니다.
- 올바르게 정리하려면
begin...ensure를 사용합니다. - 서버 연결 해제를 처리합니다.
-
보안
- API 키를
.env에 안전하게 저장합니다. - 서버 응답을 검증합니다.
- 도구 권한을 신중하게 설정합니다.
- API 키를
-
도구 이름
- 도구 이름은 여기에 명시된 형식에 따라 검증할 수 있습니다.
- 도구 이름이 명시된 형식을 따르면 MCP 클라이언트의 검증을 통과해야 합니다.
문제 해결
서버 경로 문제
- 서버 스크립트 경로가 올바른지 다시 확인합니다.
- 상대 경로가 작동하지 않으면 절대 경로를 사용합니다.
- Windows에서는 경로에 슬래시(/) 또는 이스케이프된 백슬래시(\)를 사용해야 합니다.
- 서버 파일의 확장자가 올바른지 확인합니다(Python은 .py, Node.js는 .js, Ruby는 .rb).
올바른 경로 사용 예시는 다음과 같습니다.
# Relative path
bundle exec ruby client.rb ./server/weather.rb

# Absolute path
bundle exec ruby client.rb /Users/username/projects/mcp-server/weather.rb

# Windows path (either format works)
bundle exec ruby client.rb C:/projects/mcp-server/weather.rb
bundle exec ruby client.rb C:\\projects\\mcp-server\\weather.rb
응답 시간
- 첫 응답에는 최대 30초가 걸릴 수 있습니다.
- 다음 작업이 진행되는 동안 발생하는 정상적인 현상입니다.
- 서버 초기화
- Claude의 쿼리 처리
- 도구 실행
- 이후 응답은 일반적으로 더 빠릅니다.
- 최초 대기 시간에는 프로세스를 중단하지 마세요.
일반적인 오류 메시지
다음 오류가 표시되는 경우:
Errno::ENOENT: 서버 경로를 확인하고 명령(ruby,python3,node)을 사용할 수 있는지 확인합니다.Connection refused: 서버가 실행 중이고 경로가 올바른지 확인합니다.Tool execution failed: 도구에 필요한 환경 변수가 설정되어 있는지 확인합니다.Anthropic::Errors::AuthenticationError:.env파일에 유효한ANTHROPIC_API_KEY가 있는지 확인합니다.
이 튜토리얼의 전체 코드는 여기에서 확인할 수 있습니다.
시스템 요구 사항
시작하기 전에 Linux 시스템이 다음 요구 사항을 충족하는지 확인하세요.
- 최신 안정 버전의 Rust 및 Cargo
- Anthropic API 키(Claude)
- 연결할 Python, Node.js 또는 실행 가능한 MCP 서버
환경 설정
먼저 새 Rust 프로젝트를 만듭니다.
cargo new mcp-client-rust
cd mcp-client-rust
Cargo.toml의 내용을 다음과 같이 바꿉니다.
[package]
name = "mcp-client-rust"
version = "0.1.0"
edition = "2024"

[dependencies]
anyhow = "1.0.100"
genai = "0.4.2"
rmcp = { version = "0.8.0", features = ["server", "client", "transport-io", "transport-child-process"] }
tokio = { version = "1.47.1", features = ["full"] }
tracing = "0.1.41"
tracing-subscriber = { version = "0.3", features = ["env-filter"] }
serde_json = "1.0.128"
dotenvy = "0.15.7"
reqwest = "0.12.23"
rmcp 크레이트는 Rust MCP SDK와 하위 프로세스 전송을 제공합니다. 이 예제에서는 genai 크레이트를 사용하여 Claude에 요청을 보내고 모델 요청에서 도구를 표현합니다.
API 키 설정
Anthropic Console에서 발급한 Anthropic API 키가 필요합니다.
키를 저장할 .env 파일을 만듭니다.
echo "ANTHROPIC_API_KEY=your-api-key-goes-here" > .env
.gitignore에 .env를 추가합니다.
echo ".env" >> .gitignore
클라이언트 생성
src/main.rs를 열고 다음 섹션을 진행하면서 내용을 교체합니다.
가져오기 및 클라이언트 구조
먼저 가져올 항목, 모델 상수, 기본 클라이언트 구조를 추가합니다.
use anyhow::{Context, Result, bail};
use genai::Client;
use genai::chat::{
    ChatMessage, ChatRequest, ChatResponse, ContentPart, Tool as GenaiTool, ToolResponse,
};
use rmcp::model::{CallToolRequestParam, Tool as McpTool};
use rmcp::service::{RoleClient, RunningService, ServiceExt};
use rmcp::transport::TokioChildProcess;
use serde_json::Value;
use tokio::io::{self, AsyncBufReadExt, BufReader};
use tokio::process::Command;

const MODEL_ANTHROPIC: &str = "claude-opus-5";

struct MCPClient {
    anthropic: Client,
    session: Option<RunningService<RoleClient, ()>>,
    tools: Vec<GenaiTool>,
}
클라이언트는 모델 API 클라이언트, 활성 MCP 세션, 연결된 서버가 제공하는 도구를 보관합니다.
클라이언트 초기화
다음으로 모델 클라이언트를 초기화하고 MCP 세션이나 도구가 없는 상태로 시작합니다.
impl MCPClient {
    fn new() -> Result<Self> {
        Ok(MCPClient {
            anthropic: Client::default(),
            session: None,
            tools: Vec::new(),
        })
    }

    // Additional methods will go here.
}
genai::Client::default()는 요청을 보낼 때 ANTHROPIC_API_KEY 환경 변수를 읽습니다.
서버 연결 관리
impl MCPClient 블록 안에 다음 메서드를 추가합니다.
async fn connect_to_server(&mut self, server_args: &[String]) -> Result<()> {
    if self.session.is_some() {
        bail!("Client is already connected to a server");
    }

    let mut command = Command::new(&server_args[0]);
    command.args(&server_args[1..]);

    let process = TokioChildProcess::new(command)
        .with_context(|| format!("Failed to spawn server process for {:?}", server_args))?;

    let session = ().serve(process).await?;

    let rmcp_tools = session
        .list_all_tools()
        .await
        .context("Unable to list tools from server")?;

    let tool_names: Vec<String> = rmcp_tools
        .iter()
        .map(|tool| tool.name.to_string())
        .collect();

    println!("Connected to server with tools: {tool_names:?}");

    self.tools = convert_tools(&rmcp_tools);
    self.session = Some(session);
    Ok(())
}
이 메서드는 다음 작업을 수행합니다.
- 명령줄에서 전달한 명령과 인수를 사용하여 서버를 하위 프로세스로 시작합니다.
- stdio를 통해 MCP 세션을 설정합니다.
- 서버가 제공하는 모든 도구 목록을 조회합니다.
- 도구를 모델 요청에서 사용하는 형식으로 변환합니다.
MCP 도구 변환
impl MCPClient 블록 밖에 다음 함수를 추가합니다.
fn convert_tools(tools: &[McpTool]) -> Vec<GenaiTool> {
    tools
        .iter()
        .map(|tool| GenaiTool {
            name: tool.name.to_string(),
            description: tool.description.as_deref().map(str::to_string),
            schema: Some(Value::Object(tool.input_schema.as_ref().clone())),
            config: None,
        })
        .collect()
}
MCP와 모델 API는 유사한 정보로 도구를 설명하지만 서로 다른 Rust 타입을 사용합니다. convert_tools는 각 MCP 도구의 이름, 설명, 입력 스키마를 genai 도구 정의에 매핑합니다.
모델 요청 전송
impl MCPClient 안에 다음 도우미 메서드를 추가합니다.
async fn request_model(&self, chat_req: &ChatRequest) -> Result<ChatResponse> {
    let response = self
        .anthropic
        .exec_chat(MODEL_ANTHROPIC, chat_req.clone(), None)
        .await
        .context("Anthropic chat request failed")?;

    Ok(response)
}
이렇게 하면 모델 요청 처리를 한곳에 모을 수 있으며 API 요청이 실패했을 때 유용한 컨텍스트를 추가할 수 있습니다.
쿼리 처리 로직
이제 impl MCPClient 안에 핵심 쿼리 처리 메서드를 추가합니다.
async fn process_query(&mut self, query: &str) -> Result<String> {
    let session = self
        .session
        .as_ref()
        .context("Client is not connected to any server")?;

    let mut messages = vec![ChatMessage::user(query)];
    let mut final_text = Vec::new();

    // Initial Claude API call with tools
    let mut chat_req = ChatRequest::new(messages.clone()).with_tools(self.tools.clone());
    let mut chat_rsp = self.request_model(&chat_req).await?;

    // Process response content - collect text and handle tool calls
    for text in chat_rsp.texts() {
        final_text.push(text.to_string());
    }

    let tool_calls = chat_rsp.tool_calls();
    if !tool_calls.is_empty() {
        // Append assistant's response to message history
        messages.push(ChatMessage::assistant(chat_rsp.content.clone()));

        // Execute each tool call and collect responses
        let mut tool_results = Vec::new();
        for tool_call in tool_calls {
            // Add information about the tool call to final text
            let tool_args_str = serde_json::to_string(&tool_call.fn_arguments)
                .unwrap_or_else(|_| "{}".to_string());

            final_text.push(format!(
                "[Calling tool {} with args {}]",
                tool_call.fn_name, tool_args_str
            ));

            // Query the MCP server
            let tool_result = session
                .call_tool(CallToolRequestParam {
                    name: tool_call.fn_name.clone().into(),
                    arguments: tool_call.fn_arguments.as_object().cloned(),
                })
                .await
                .with_context(|| format!("Tool call {} failed", tool_call.fn_name))?;

            let payload = serde_json::to_string(&tool_result)
                .context("Failed to serialize tool result")?;

            tool_results.push(ContentPart::ToolResponse(ToolResponse::new(
                tool_call.call_id.clone(),
                payload,
            )));
        }

        // Append tool responses to message history
        messages.push(ChatMessage::user(tool_results));

        // Build the next request and query model
        chat_req = ChatRequest::new(messages.clone());
        chat_rsp = self.request_model(&chat_req).await?;

        // Collect text from response
        for text in chat_rsp.texts() {
            final_text.push(text.to_string());
        }
    }

    Ok(final_text.join("\n"))
}
이 메서드는 먼저 사용자의 쿼리와 사용 가능한 도구를 Claude로 전송합니다. Claude가 도구를 요청하면 클라이언트가 MCP 세션을 통해 각 요청을 실행하고 결과를 Claude로 다시 보낸 다음 최종 텍스트 응답을 수집합니다.
대화형 채팅 인터페이스
impl MCPClient 안에 대화형 터미널 루프를 추가합니다.
async fn chat_loop(&mut self) -> Result<()> {
    println!("\nMCP Client Started!");
    println!("Type your queries or 'quit' to exit.");

    let mut stdin = BufReader::new(io::stdin());
    let mut input = String::new();

    loop {
        print!("\nQuery: ");
        std::io::Write::flush(&mut std::io::stdout())?;

        input.clear();
        if stdin.read_line(&mut input).await? == 0 {
            break; // EOF
        }

        let query = input.trim();
        if query.eq_ignore_ascii_case("quit") {
            break;
        }
        if query.is_empty() {
            continue;
        }

        match self.process_query(query).await {
            Ok(response) => println!("\n{}", response),
            Err(err) => println!("\nError: {}", err),
        }
    }

    Ok(())
}
이 루프는 사용자가 quit를 입력하거나 표준 입력을 닫을 때까지 쿼리를 받습니다. 쿼리 오류가 발생하면 클라이언트를 종료하지 않고 오류를 출력합니다.
정리
MCP 세션과 하위 프로세스를 중지하도록 impl MCPClient 안에 다음 메서드를 추가합니다.
async fn cleanup(&mut self) -> Result<()> {
    if let Some(session) = self.session.take() {
        let _ = session.cancel().await;
    }
    Ok(())
}
기본 진입점
마지막으로 impl MCPClient 블록 밖에 비동기 진입점을 추가합니다.
#[tokio::main]
async fn main() -> Result<()> {
    dotenvy::dotenv().context("Failed to load env file")?;

    let mut args = std::env::args();
    let _ = args.next();
    let server_args: Vec<String> = args.collect();

    if server_args.is_empty() {
        eprintln!("Usage: cargo run -- <server_script_or_binary> [args...]");
        std::process::exit(1);
    }

    let mut client = MCPClient::new()?;

    let result = async {
        client.connect_to_server(&server_args).await?;
        client.chat_loop().await
    }
    .await;

    let cleanup_result = client.cleanup().await;

    result?;
    cleanup_result?;

    Ok(())
}
이 진입점은 .env를 불러오고 나머지 명령줄 인수를 모두 서버 명령으로 처리한 뒤 클라이언트를 연결하고 채팅 루프를 시작합니다. 또한 종료 전에 정리 작업이 실행되도록 보장합니다.
전체 파일 확인
클라이언트를 실행하기 전에 src/main.rs의 항목이 올바른 범위에 배치되어 있는지 확인합니다.
new,connect_to_server,process_query,request_model,chat_loop,cleanup은 하나의impl MCPClient블록 안에 있는 메서드입니다.main과convert_tools는impl MCPClient블록 밖에 있는 함수입니다.
Rust에서는 이러한 항목이 특정 순서로 나올 필요는 없지만 메서드와 자유 함수는 올바른 범위에 배치해야 합니다. 파일을 전체 src/main.rs 예제와 비교한 다음 컴파일되는지 확인합니다.
cargo fmt --check
cargo check
클라이언트 실행
cargo run -- 뒤에 평소 MCP 서버를 시작할 때 사용하는 명령을 입력합니다.
# Python server
cargo run -- python path/to/server.py

# Node.js server
cargo run -- node path/to/build/index.js

# Executable server
cargo run -- path/to/server-binary
서버 명령 없이 cargo run만 실행하면 사용법 메시지를 출력하고 종료합니다.
클라이언트는 다음과 같이 작동합니다.
- 지정된 MCP 서버를 시작하고 연결합니다.
- 해당 서버에서 사용 가능한 도구 목록을 조회합니다.
- 다음 작업을 수행할 수 있는 대화형 채팅 세션을 시작합니다.
- 쿼리 입력
- 도구 실행 확인
- Claude의 응답 수신
작동 방식
쿼리를 제출하면 다음 과정이 진행됩니다.
- 클라이언트가 쿼리와 서버에서 사용 가능한 도구를 Claude로 전송합니다.
- Claude가 사용할 도구가 있는지 판단하고 해당 도구를 선택합니다.
- 클라이언트가 MCP 세션을 통해 요청된 도구를 실행합니다.
- 도구 결과가 Claude로 다시 전송됩니다.
- Claude가 자연어 응답을 생성합니다.
- 터미널에 응답이 표시됩니다.
모범 사례
-
오류 처리
- 프로세스, MCP, 모델 API 및 직렬화 경계에서 오류에 컨텍스트를 추가합니다.
- 대화형 세션을 종료하지 않고 개별 쿼리 오류를 보고합니다.
- 서버 명령을 실행하기 전에 검증합니다.
-
리소스 관리
- 정리 작업 중에는 항상 MCP 세션을 취소합니다.
- 연결 또는 채팅 루프 작업이 실패해도 정리 작업이 실행되도록 보장합니다.
- 세션이 활성 상태일 때 두 번째 서버를 시작하지 않습니다.
-
보안
- API 키를
.env에 안전하게 저장합니다. - 모델 기반 호출을 허용하기 전에 서버가 노출하는 도구를 검토합니다.
- 신뢰할 수 있는 서버와 실행 명령에만 연결합니다.
- API 키를
문제 해결
서버 명령 문제
cargo run -- 뒤의 인수는 완전한 명령을 구성해야 합니다. 인터프리터로 실행하는 서버 스크립트에는 해당 런타임이 필요합니다.
# Correct
cargo run -- python ./server/weather.py
cargo run -- node ./server/build/index.js

# Incorrect: a Python script is not necessarily executable by itself
cargo run -- ./server/weather.py
명령을 찾을 수 없으면 절대 경로를 사용하거나 해당 명령이 PATH에 등록되어 있는지 확인합니다.
환경 파일 문제
Failed to load env file이 표시되면 클라이언트를 실행하는 디렉터리에 .env가 있는지 확인합니다.
모델 요청에서 API 키가 없다고 보고하면 .env에 다음 내용이 있는지 확인합니다.
ANTHROPIC_API_KEY=your-api-key-goes-here
도구 및 응답 오류
Unable to list tools from server: 서버가 정상적으로 시작되고 stdio를 통해 통신하는지 확인합니다.Tool call ... failed: 서버 도구에 필요한 인수와 환경 변수를 확인합니다.Failed to serialize tool result: 서버 응답에 지원되지 않거나 잘못된 형식의 콘텐츠가 있는지 확인합니다.